When you click on links to various merchants on this site and make a purchase, this can result in this site earning a commission. Affiliate programs and affiliations include, but are not limited to, the eBay Partner Network.
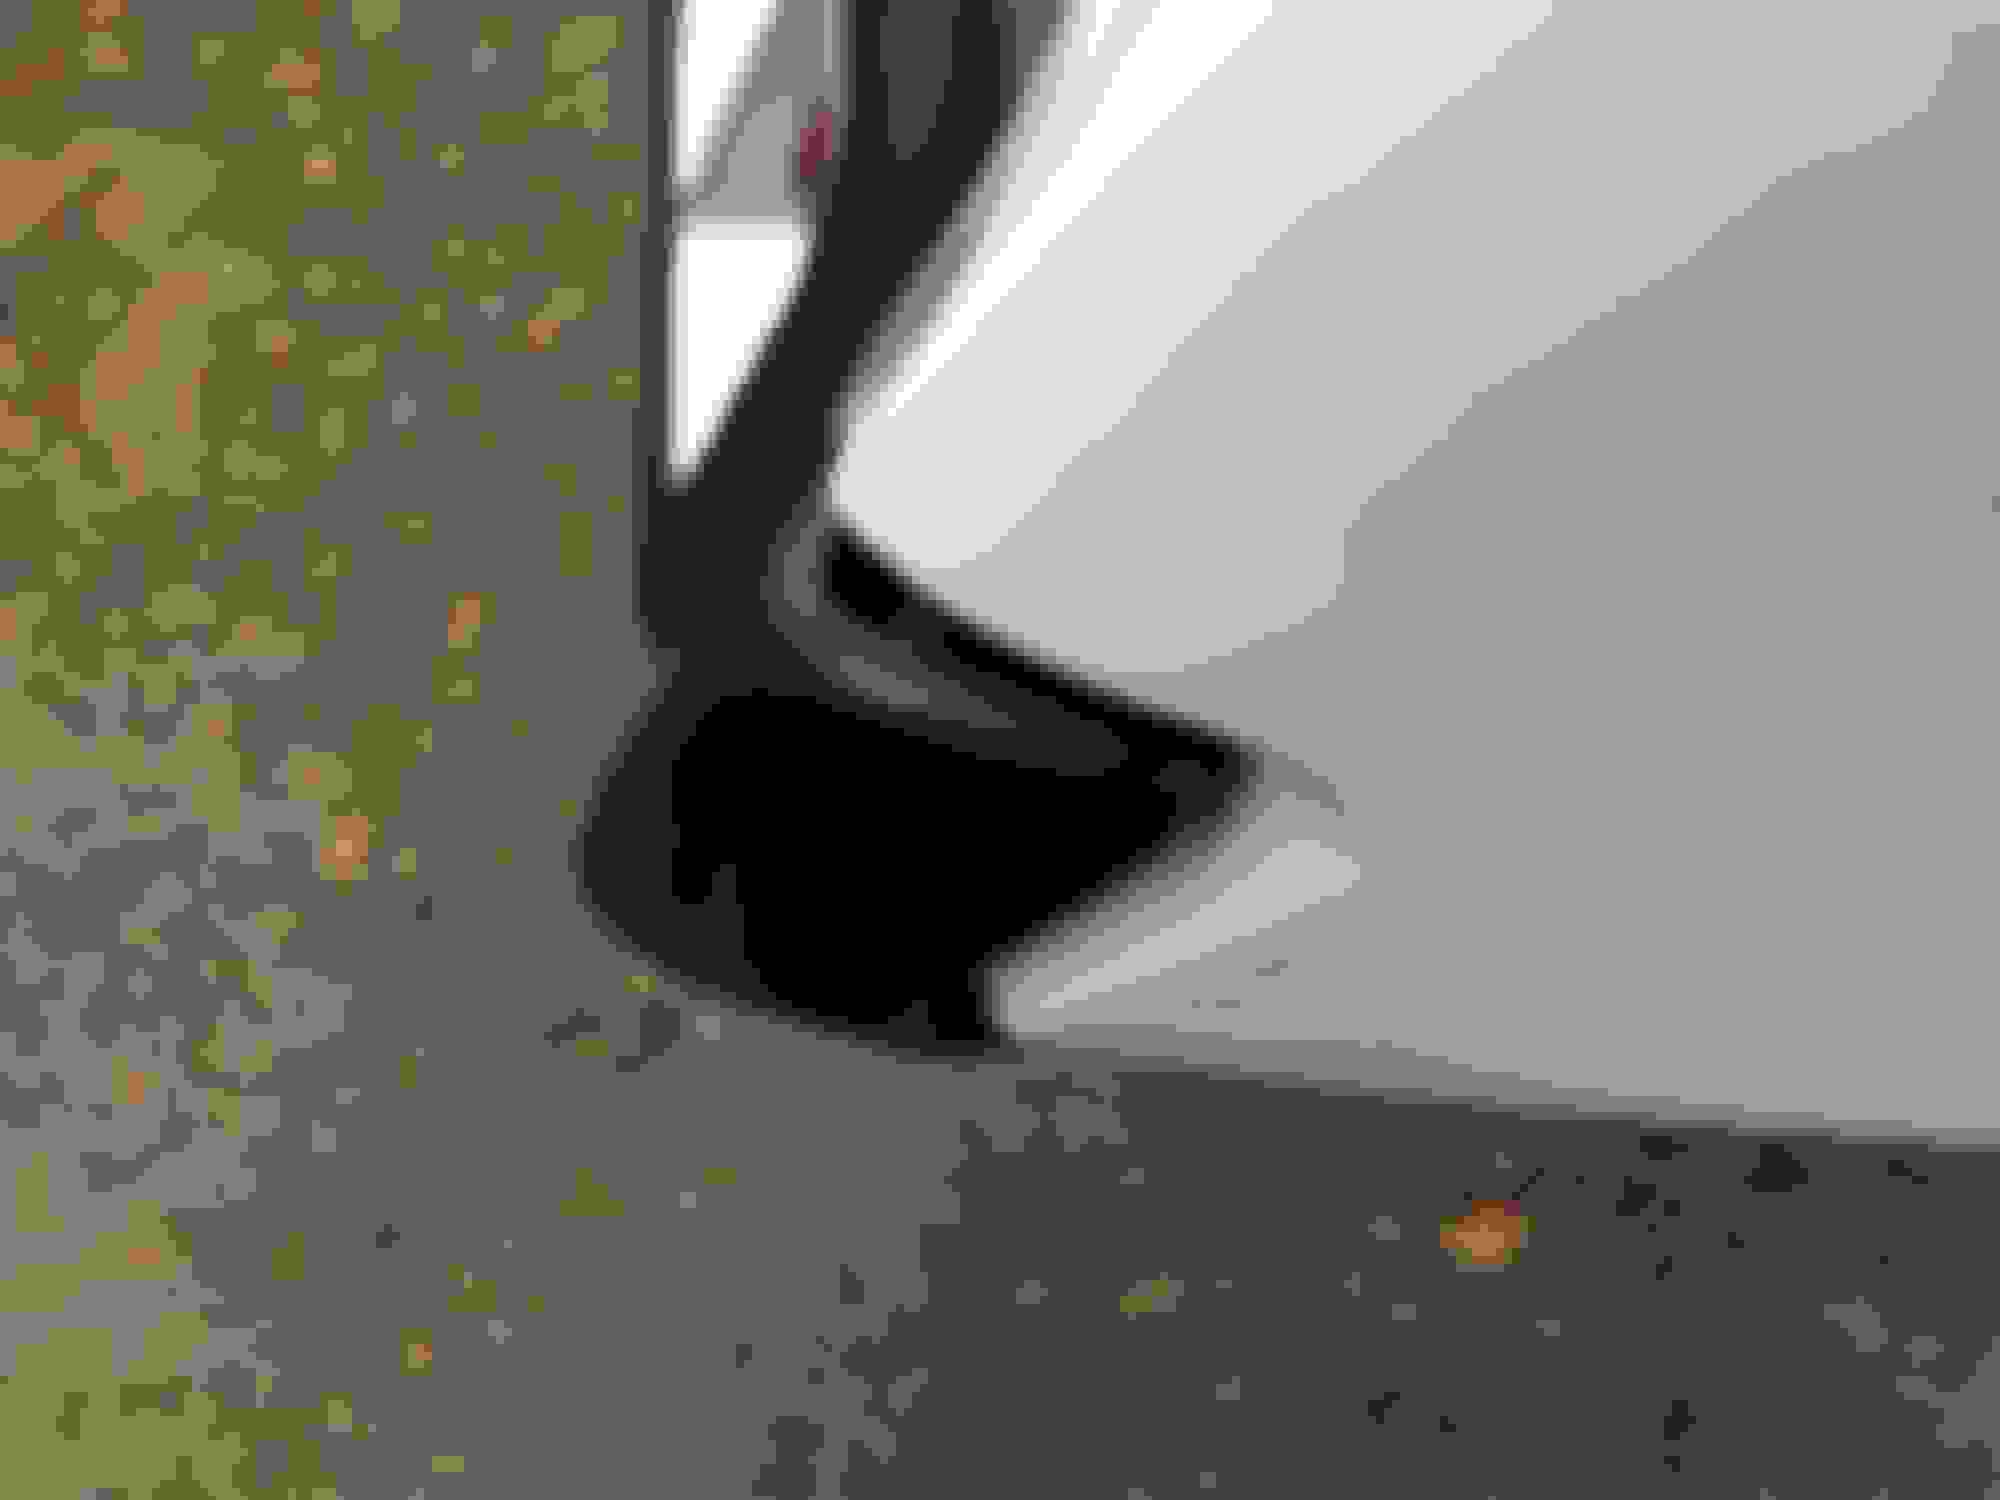
So when I was looking at the pics that were snapped by my stepson, I noticed something a little "off" about the rear bumper on the driver side. Further inspection revealed that at some point in it's former life, my Cutlass had incurred some damage.
If you look closely at these pics, you'll see that where the driver side meets the body, it's not as close as the passenger side . Is there a way I can "tighten it up" and at least make it look better without taking the bumper off? I'm not trying to get it perfect but would like to at least make it look better.
Bumpers can adjust side to side, in and out, up and down, and angle. It looks like a simple adjustment. Bumper fit is always a compromise, you just have to tweak the fit and split the difference.
Bumpers can adjust side to side, in and out, up and down, and angle. It looks like a simple adjustment. Bumper fit is always a compromise, you just have to tweak the fit and split the difference.
The bumper brackets are slotted where they bolt to the frame and are supposed to be adjusted to properly set these gaps. It's entirely possible that the bumper is tweaked but it is just as likely that the bumper was not properly installed after it was painted. Note that you are also missing the rubber fillers that go in the bumper ends and help set this gap.
The bumper brackets are slotted where they bolt to the frame and are supposed to be adjusted to properly set these gaps. It's entirely possible that the bumper is tweaked but it is just as likely that the bumper was not properly installed after it was painted. Note that you are also missing the rubber fillers that go in the bumper ends and help set this gap.
This forum is a wealth of information! Had I not posted this question, I would probably have never known about these fillers, so thanks for that Joe. I will do some shopping and get these.😀
Ummm...I just thought of something. With the way the taillights are set into the trunk area and the fact that the bumper houses the taillights, it doesn't look like I will be able to adjust the rear bumper without moving the taillights out of whack. Am I right?
The tail lights are bolted to the bumper only, not the car body, and move with the bumper. The wires from the bumper to the body has plenty of extra length.
This forum is a wealth of information! Had I not posted this question, I would probably have never known about these fillers, so thanks for that Joe. I will do some shopping and get these.😀
Indeed, it is. These have been on my to-do list since I purchased my 71' CS Convertible several months ago. I am finishing up the re-installation of my rear bumper. Having found the bloody rattle coming from the rock guard protectors hitting the bottom of the trunk. I could have very easily just moved them downward; yet, I elected to drop the dual exhausts, remove the bumper, remove all the light assemblies, thoroughly clean all the bulb/lamp sockets, clean all the lenses, update the wiring loom plugs leading into the trunk, install new exhaust brackets, etc., etc.
Just ordered a set of the rubber bumper brackets to accommodate both the front & rear. Glad you brought up the question, glad I saw Joe's comment.
As per what Joe stated - with additional feedback. The bumper contains (as Joe stated) all of the light assemblies - they are attached directly to the inside of the rear bumper. There are x2 rear bumper brackets - one left-hand side and one right-hand side. The rear bumper is attached to each bumper bracket via x2 bolts (notice the x4 chrome plated heads of the rear bumper bracket(s) bolts protruding through the bumper - x2 on each side - one top/one bottom). These bolts facilitate the movement/adjustment of the bumper left & right. Where each bumper bracket mounts to the frame, there are x2 bolts on each bumper bracket - a forward bolt and a rear bolt which attach each bumper bracket to the frame. These bolts facilitate the movement of the bumper both up & down, and forward & aft. Begin by loosening the forward bolt on each bumper bracket, then loosen each aft bolt - you will now be able to facilitate movement of the bumper up/down, forward/aft. This will get you the wiggle room to insert your rubber bumper brackets and secure a nice fit. If you need adjustment left or right, loosen the x4 chrome plated bolts which attaches the bumper to the bumper brackets.
I understand that the tailignts will move with the bumper, but what I'm concerned about is the area of the bumper that houses the tailignts. If I shift the bumper to one side or the other, then the gap between the tailight section of the bumper and the rear of the car will be off. (Too much gap one side and too little gap on the other). And if I'm not mistaken, right now the tailight section of the bumper sits pretty even on both sides of the car in relation to the tailight section on the body....I dunno if I have that much wiggle room to move the bumper over enough to close that gap on the driver side without the tailight sections of the bumper hitting the end cap on the quarter panel on the passenger side and the inside of the trunk lid on the driver side.
Does that clear things up for y'all?😀
Last edited by 72455; November 20th, 2018 at 08:57 PM.
You have lots of wiggle room. IMO, your bumper is set pretty close to the body. Order the bumper rubber fillers, loosen up the bolts, install the rubber fillers & you'll be surprised how much adjustment you can make.
mrolds69 is spot-on "Bumper fit is always a compromise, you just have to tweak the fit and split the difference."
Location: Edmonton, AB. And "I am Can 'eh' jun - eh"
Posts: 24,525
Originally Posted by 72455
I understand that the tailignts will move with the bumper, but what I'm concerned about is the area of the bumper that houses the tailignts. If I shift the bumper to one side or the other, then the gap between the tailight section of the bumper and the rear of the car will be off. (Too much gap one side and too little gap on the other). And if I'm not mistaken, right now the tailight section of the bumper sits pretty even on both sides of the car in relation to the tailight section on the body....I dunno if I have that much wiggle room to move the bumper over enough to close that gap on the driver side without the tailight sections of the bumper hitting the end cap on the quarter panel on the passenger side and the inside of the trunk lid on the driver side.
Does that clear things up for y'all?😀
Dave,
You're overthinking this. When you adjust the bumper, you're only loosening 4 bolts/nuts on the bumper support that bolts to the rear frame. You're not adjusting it side to side, just up and down, or in/out. It will allow you to slide the bumper a small amount out and up to make the correction. To install the fillers, you're going to drop it down an inch or two to fit in the fillers. Just a tip on the fillers. Aftermarket ones tend to come loose after awhile, so I put a small amount of 3M adhesive on the channel to hold them from moving. I can't remember if you bought the Cutlass Assembly Manual but the clearances are provided in that. Here are a couple pics of my 72 when I did the replacement rear bumper on it. All adjustments were completed with the all the rear hardware installed in the bumper.
Do NOT undo the 4 bolts that hold the bumper to the bumper support.
Location: Edmonton, AB. And "I am Can 'eh' jun - eh"
Posts: 24,525
Originally Posted by 72455
Ok..and it seems there are ones for the front bumper as well, correct?
None on the front end Dave. Just the back. Other years of Cutlass like the 66/67 had them on front.
And yes, the fillers are intended to be a permanent part of the bumper. That's why I suggested a 3M adhesive in the grooves to hold them in place. Otherwise the aftermarket ones have a tendency to not fit 100% and come away from the bumper.
If the end of the bumper is bent outwards and the rest of the bumper adjustment looks OK, then perhaps a 2x4 or 2x6 resting against the bumper and a BFH smartly applied against the wood will instill a proper alignment.
Location: Edmonton, AB. And "I am Can 'eh' jun - eh"
Posts: 24,525
Dave, I suspect there's damage to your car, but it's likely the attaching brackets that are bent. That would explain why the bumper is 'offset'. The bumper bolts directly to the bumper brackets and is not movable that way. The other, and more severe problem could be the rear frame extension past the rear axle might also be slightly bent. Can you post pictures of it? There are guys on this site who could provide you with good brackets if yours are bent. They are really heavy gauge steel, which means that if they are bent, the right rear side of your car took a fair hit at one time. You very well may have to remove the bumper completely if the brackets are bent. I'll follow along with this thread. You can always PM me as before if you need anything specific.
Allan
Location: Edmonton, AB. And "I am Can 'eh' jun - eh"
Posts: 24,525
Dave,
Here's what the bumper brackets look like. These are mine prior to bead blasting and repaint. You can see the adjustment grooves in the metal and how they are flat. They bolt directly to the frame rail where the slots are, and the bumper bolts to the 90� angle plate. You can see where the OEM bolt washers bit into the metal to hold it in place. If you have regular washers and bolts on the bumper bracket - ditch them. They don't hold properly. Order the right ones (available from aftermarket supplier) I got mine from InLine Tube and they're exactly right and hold the bracket securely.
If you need to adjust the bumper left or right, loosen (do not remove) the x4 chrome plated attachment bolts located on the bumper which attach to the bumper bracket on each side. This is how you adjust the bumper left or right and is specifically why each opening is elongated ~1" - to adjust for lateral movement/placement of the bumper.
You can see where the OEM bolt washers bit into the metal to hold it in place. If you have regular washers and bolts on the bumper bracket - ditch them. They don't hold properly.
And be aware that with the correct bolts and washers that they need to be tightened very well in order to hold the bumper in place. The bumper on my 70 Supreme slipped when I used the factory bumper jack after having the bumper off - I thought I had those bolts tight but when the weight of the car was on them they slipped.
Location: Edmonton, AB. And "I am Can 'eh' jun - eh"
Posts: 24,525
Originally Posted by Vintage Chief
If you need to adjust the bumper left or right, loosen (do not remove) the x4 chrome plated attachment bolts located on the bumper which attach to the bumper bracket on each side. This is how you adjust the bumper left or right and is specifically why each opening is elongated ~1" - to adjust for lateral movement/placement of the bumper.
Yes, that is true. Here is a a better picture of those holes. Dave may be lucky and find they can be centered quite easily. I had forgotten the mating surface on the bumper itself had those slots.
Yes, that is true. Here is a a better picture of those holes. Dave may be lucky and find they can be centered quite easily. I had forgotten the mating surface on the bumper itself had those slots.
Dave, I suspect there's damage to your car, but it's likely the attaching brackets that are bent. That would explain why the bumper is 'offset'. The bumper bolts directly to the bumper brackets and is not movable that way. The other, and more severe problem could be the rear frame extension past the rear axle might also be slightly bent. Can you post pictures of it? There are guys on this site who could provide you with good brackets if yours are bent. They are really heavy gauge steel, which means that if they are bent, the right rear side of your car took a fair hit at one time. You very well may have to remove the bumper completely if the brackets are bent. I'll follow along with this thread. You can always PM me as before if you need anything specific.
Allan
Hey Allan thanks for the advice. Here are the pics of my chassis bumper braces and they look fine. Agreed?
Location: Edmonton, AB. And "I am Can 'eh' jun - eh"
Posts: 24,525
Just remember that the nuts on those bolts have likely been on for awhile. I'd give them a spray of PB Blaster or similar penetrating fluid and let the sit for a day before going in there. It's a bit of a tight clearance so make sure you use either a 6 point socket or 6 point wrench to avoid rounding off the nuts. Use a wood block to tap the bumper. Go gently as you don't want this to move a lot. When you have the bumper in place cinch down the nuts to at least 90 lb/ft on your torque wrench. I can't see the kind of washers you have on the bracket itself. There will be 2 per side. Any chance you can get a reasonable shot of those? They should have small 'teeth' all the way around the perimeter to dig into the bumper bracket.
Just remember that the nuts on those bolts have likely been on for awhile. I'd give them a spray of PB Blaster or similar penetrating fluid and let the sit for a day before going in there. It's a bit of a tight clearance so make sure you use either a 6 point socket or 6 point wrench to avoid rounding off the nuts. Use a wood block to tap the bumper. Go gently as you don't want this to move a lot. When you have the bumper in place cinch down the nuts to at least 90 lb/ft on your torque wrench. I can't see the kind of washers you have on the bracket itself. There will be 2 per side. Any chance you can get a reasonable shot of those? They should have small 'teeth' all the way around the perimeter to dig into the bumper bracket.
I'll see if I can get a shot of the washers but not today ..rainy
I'll see if I can get a shot of the washers but not today ..rainy
They're tooth-hooked type washers. If you replace them get stainless or the like to reduce corrosion/oxidation.
One 'tip' on the nuts, washers & bolts. Whenever I reassemble nuts, bolts & washers for this type application, I (literally) soak/drench (coat) the nuts, bolts & washers in (generally axle) grease when reassembling - you can always wipe off any excess; but, the grease allows you to move the assembly with ease when reattaching and it protects the nuts, bolts & washers from corrosion/oxidation for a lengthy period of time (in particular if you're using the same nuts, bolts & washers). https://www.google.com/search?tbm=is...30.B5B42rhP2IA
Gotcha....once I make the adjustment, do I leave the rubber fillers in place, or take them out?
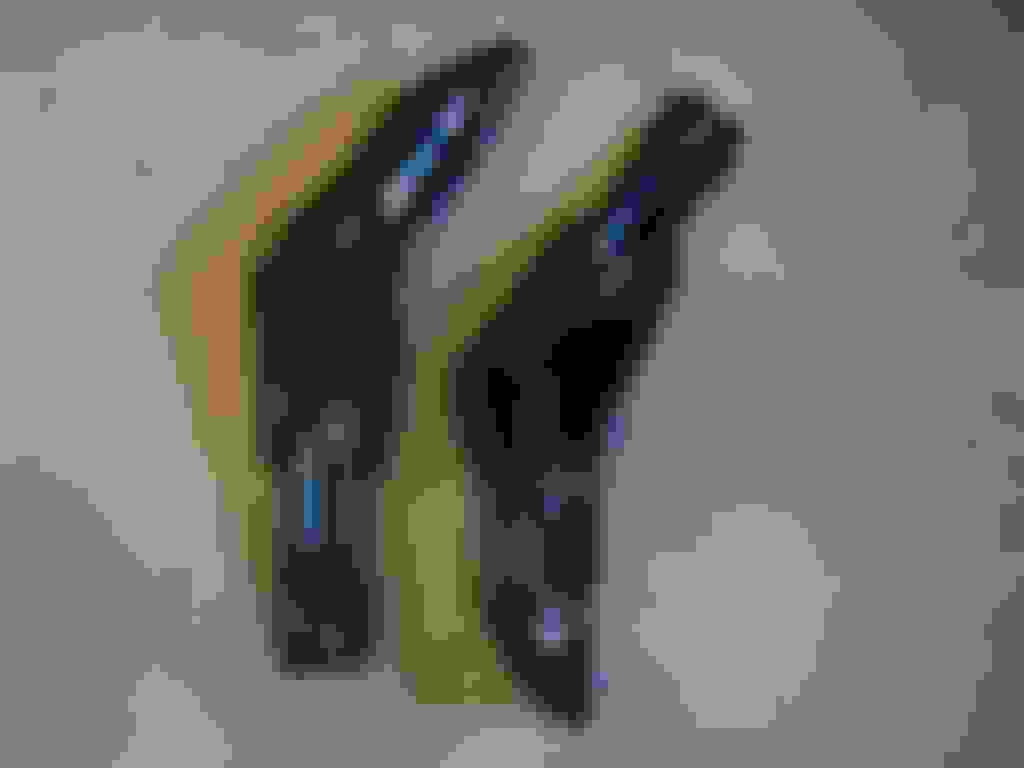
Dave- I just installed mine. I mistakenly ordered x2 sets. Since I did, I snapped a couple images demonstrating the installation orientation. Marked on the backside of each bumper filler there is an L or an R.
If you elect to install these bumper fillers: Tip: (1) Slide the center of the bumper filler onto/into the bumper first, then work your way out from the center on each side of the bumper filler. (2) Be certain to slide the bumper filler all the way into the groove - all the way - it's a tug & tight fit. (3) You can install these with the bumper mounted to the frame brackets - yet, it's a very tight squeeze noodling them into position. I only loosened the bolts where the brackets attach to the frame. Had I had them on-hand prior to complete reassembly of my bumper, I would have installed them while the entire bumper was detached from the vehicle. Kind of a pain - nothing like passing a kidney stone though.
Allan- 350 CID
We went through identification via VIN derivative numbers, cylinder head & block numbers. That's cool, I know you follow other threads & it probably slipped your attention.
Title of my post "Newb - 1971 Cutlass Supreme Rocket 350" (see your Post #40).
Cylinder block & cylinder head numbers are 350 CID. Additionally, I have the number 7 located next to both cylinder #1 & cylinder #8.
Why do you ask - because of the rear bumper? When I purchased the vehicle (July) the placard stated a 442 rear bumper. I have not validated this. Therefore, I can't say for certain the bumper is a 442 rear bumper and I cannot say from what year the bumper is from. I'm working on it though. If it's a 442 rear bumper (probably is), then the vehicle is psyching itself out into believing it wants to be one of the big boys.
I've had 455CID engines in the past (in my youth). Come to think about it, I believe we fed those engines piston rings each year - they always ran better with new ones.
Last edited by Vintage Chief; November 27th, 2018 at 02:40 PM.
BTW, I'd like to say this about air conditioning.
While it's a great additional feature (I just did an R&R of my AC evaporator core, drier, compressor & POA valve). I envy anyone who owns a vehicle without AC.
Getting a wrench (especially torque wrench) on either cylinder #8 or cylinder #2 are a PITA - try getting the compression gauge on those cylinders - bloody knackers is what it is. Whoever developed the swivel head sockets was genius.
Location: Edmonton, AB. And "I am Can 'eh' jun - eh"
Posts: 24,525
Oops, my bad. Yes, now I remember all the information sharing we did. Got a lot on my mind right now. Just an FYI, it was not uncommon for dealers to change out the rear bumper and exhaust for a customer who wanted the 442 'look'. Personally I like the cutout bumper and think ALL Olds A bodies with dual exhaust should have got them. My car also has the cutout bumper which I installed back in 2012. I wouldn't be surprised that many an owner did exactly the same thing. I'm not too worried about anyone critiquing that it's not technically correct because I love the way it looks. From the earlier post (note: before the N10 exhaust tips were changed to trumpets)
Location: Edmonton, AB. And "I am Can 'eh' jun - eh"
Posts: 24,525
Ah--I don't have AC in this car. VERY easy to work on the plugs or anything else for that matter. I feel sorry for anyone who has to work under the dash with AC too. So many valences and hoses to remove....
Ah--I don't have AC in this car. VERY easy to work on the plugs or anything else for that matter. I feel sorry for anyone who has to work under the dash with AC too. So many valences and hoses to remove....
Additionally, I just finished x2 weeks with the rear seats out, and the entire dash taken apart - removed the original AM/FM Stereo, front & rear speaker, installed new AM/FM Stereo + x2 front/x2 rear custom Memphis speakers, and found not one but (lucky me) two shorts in the wiring harness - which are fully repaired (including heat shrink, of course) with all wires - get this - LABELED (who the hell does that? I do). Anyways, yeah - dashes w/ AC ducts are simply - time consuming. All lighting works (I was having issues with courtesy lights, etc. - continually blowing the 25AMP fuse which was not difficult to troubleshoot - it just required methodical detail for analyzing the bundles).
Last edited by Vintage Chief; November 27th, 2018 at 02:57 PM.
Location: Edmonton, AB. And "I am Can 'eh' jun - eh"
Posts: 24,525
Nice. Labeling makes everything that much easier. Probably no one does it because they don't expect to ever look at it again. I'm guessing you have the 71 CSM? It has the best color schematic of all the wiring in the car doesn't it?
Nice. Labeling makes everything that much easier. Probably no one does it because they don't expect to ever look at it again. I'm guessing you have the 71 CSM? It has the best color schematic of all the wiring in the car doesn't it?
Ask me a question about the CSM 1971 wiring diagram/schematic. I'll tell you what color(s) the wire(s) is(are) - from memory! I own a 'big ***' magnifying glass.
 November 20th, 2018, 06:59 AM


 I own a 'big ***' magnifying glass.


