When you click on links to various merchants on this site and make a purchase, this can result in this site earning a commission. Affiliate programs and affiliations include, but are not limited to, the eBay Partner Network.
I'm trying to get my HVAC system sorted out on my 1966 Ninety Eight. It has the Custom climate control.
I guess I'll explain what's happening first, and then let you know what I've checked so far.
First issue - When I move my temperature lever to the warm position and press the heat button, the blower motor fires up and nice hot air starts blowing. The problem is, it's all coming out of the A/C vents (left-center-right). According to my service manual, in this configuration, vacuum should be applied to both the outside air door (opening it for 100% outside air) and the mode door (changing the hot air direction to the floor vents). Now, I can't comment on what the outside air door is doing, but it's obvious that the mode door isn't changing and redirecting the heat to the lower vents. The default (no vacuum applied) position of the mode door is to allow the A/C vents to work. I should also mention that when I push the HEAT button, the above happens, but the button itself doesn't stay in. It just pops right out. Shouldn't it stay pushed in?
Second issue - When I push the DEF button, the blower motor turns on, but nothing comes out of the top defrost vents. Now, I'm pretty sure this is connected to the first issue because the defrost door is on the heat path. Since the mode door isn't switching from the A/C vents to the heat vents, the defrost can't then redirect the heat to the defrost. I should mention that this button also pops right out and doesn't stay in.
When I push the Normal button, it stays in, turns the blower and compressor on, and sends air (not cold, probably has a refrigerant leak) through the A/C vents like it should. I can't comment on whether or not full vacuum is being applied to the outside air door like it's supposed to. It should be fully open, allowing 100% outside air during "Normal" operation.
The Recir button reacts the same as the Normal button previously mentioned. I can't comment on whether or not partial vacuum is being applied to the outside air door like it's supposed to. It should be partially open, allowing only 20% outside air during "Recir" operation.
The Vent button stays in and turns the blower motor on. I can't comment on whether or not full vacuum is being applied to the outside air door like it's supposed to. It should be fully open, allowing 100% outside air during "Vent" operation.
What I've checked so far:
So, I've done a visual inspection (without pulling the HVAC control out), and everything looks great from what I can tell. With the car running, I pulled the vacuum line off the water valve while the temp lever was in the cool position. There was no vacuum at the hose, which was to be expected. When I moved the lever to the warm position, I felt a very light vacuum on my finger at the hose end. All of this is to be expected because the heat going into the car has been nice and toasty. But this little experiment confirmed that I do have vacuum coming out of the engine, going to the tank, getting to the temperature control portion of the controls, and being sent out to the water valve. I should also mention that the blowing air turns cool when I move the temp lever to cool, indicating that the temperature door and cable are working as intended.
Next little test: I pulled the vacuum line from the mode door actuator while in Normal mode, put my finger on the end of the hose, and switched to Heat mode. I should have felt vacuum being applied but didn't. No vacuum is coming from that hose during any mode, which explains the heat coming out of the A/C vents.
Next, I did the same test to the defrost actuator (switching DEF on and off), and again, no vacuum. Now, even if this actuator was working, it wouldn't send heat up to the windshield because the mode door isn't working. The defrost function can only work with both of these doors working.
So, to sum it all up, both the Heat and DEF buttons don't stay in, there is no vacuum going to the mode and defrost actuators, and I can't comment on whether or not the outside air actuator is working or not (probably not, given that the others aren't).
The temperature control aspect of the HVAC does appear to be working correctly. Vacuum is coming out of the engine, going to the tank, getting to the temperature control portion of the controls, and being sent out to the water valve. In addition to that, the temperature door and cable are both working.
So, it looks like my issues are based around the selection rotary valve portion of my controls. Anyone have any suggestions, ideas, or opinions on what my next move should be?
The pushbuttons should latch in any position you select. Pushing another one should unlatch any that are pushed in. Blower should not operate in OFF or VENT.
Sounds like the control head needs a good cleaning and lubrication. Possibly a vacuum hose on the mode selector valve has split or come off.
The pushbuttons should latch in any position you select. Pushing another one should unlatch any that are pushed in. Blower should not operate in OFF or VENT.
Sounds like the control head needs a good cleaning and lubrication. Possibly a vacuum hose on the mode selector valve has split or come off.
Thanks for the reply!
I do have the '66 service manual. It's helped me understand this quite a bit but not totally.
Thanks for clarifying that all of the buttons should stay pushed in. That confirms that something is wrong.
The blower definitely doesn't operate in the off position but does operate in the vent position if I turn the fan on. In the lowest fan selection, the fan doesn't run in the vent position. I could be wrong, but I thought the manual said that the fan could run in the vent position but it would only push in fresh air and should only be necessary when the vehicle isn't in motion.
Do you know how the control assembly should be removed? I don't think the manual explains this procedure.
-Chris
Edit: I just checked the manual and it does say that the blower motor can be operated in vent mode.
Last edited by IHChris; October 21st, 2023 at 11:10 PM.
I’m a hobbyist, not a mechanic, but I’ve been working on these systems for about 40 years. I don’t mess with refrigerant or compressors, but vacuum systems make sense to me. Your system is the same one I have in my '66 Starfire. Let's get into it.
Vacuum Hoses
First up, your color-striped control vacuum hoses are old. As is your piano-key control unit. While the compressor, evaporator, condenser, heater core or other major parts are pretty easy to replace, on big Olds's the control vacuum hoses are almost always original. 57 years later these vacuum hoses can leak. The vacuum leaks occur mostly where they connect to the nipples they're supposed to seal against: the stress of the seal eventually cracks or splits the rubber hose. Once the hose leaks vacuum, it pulls less hard on whatever diaphragm it’s supposed to control, or maybe it doesn’t work at all.
The real obvious cracked or split hoses ones hiss audibly when you push the key to ask them to function. So run your controller through its paces & listen for a hissing sound. It’s good to have a note pad to write down when you hear any hisses so you can chase them down.
Olds left the vacuum hoses a little long at the factory. This means is that you can snip off about 1/4" - 1/2" of any cracked hose ends and re-use the hose without much work. If you do shorten the lines, be sure to spray both the metal nipple on the control unit or vacuum diaphragm & _also_ the insides of the hose ends with silicone spray lubricant. If you don't, the next 1/2-3/4" of hose may split. Eventually you run out of color striped hose to fix...
If the old hoses continue to split, use a plastic vacuum union into the old hose, with the other end being a new hose to the control unit. It ain’t pretty, but it should work so long as the plastic union part doesn’t split the hose like the factory metal nipple did. Label the end of any generic hose with the stripe color that the factory assigned or you’ll never remember what you did on that Sunday night to fix it…
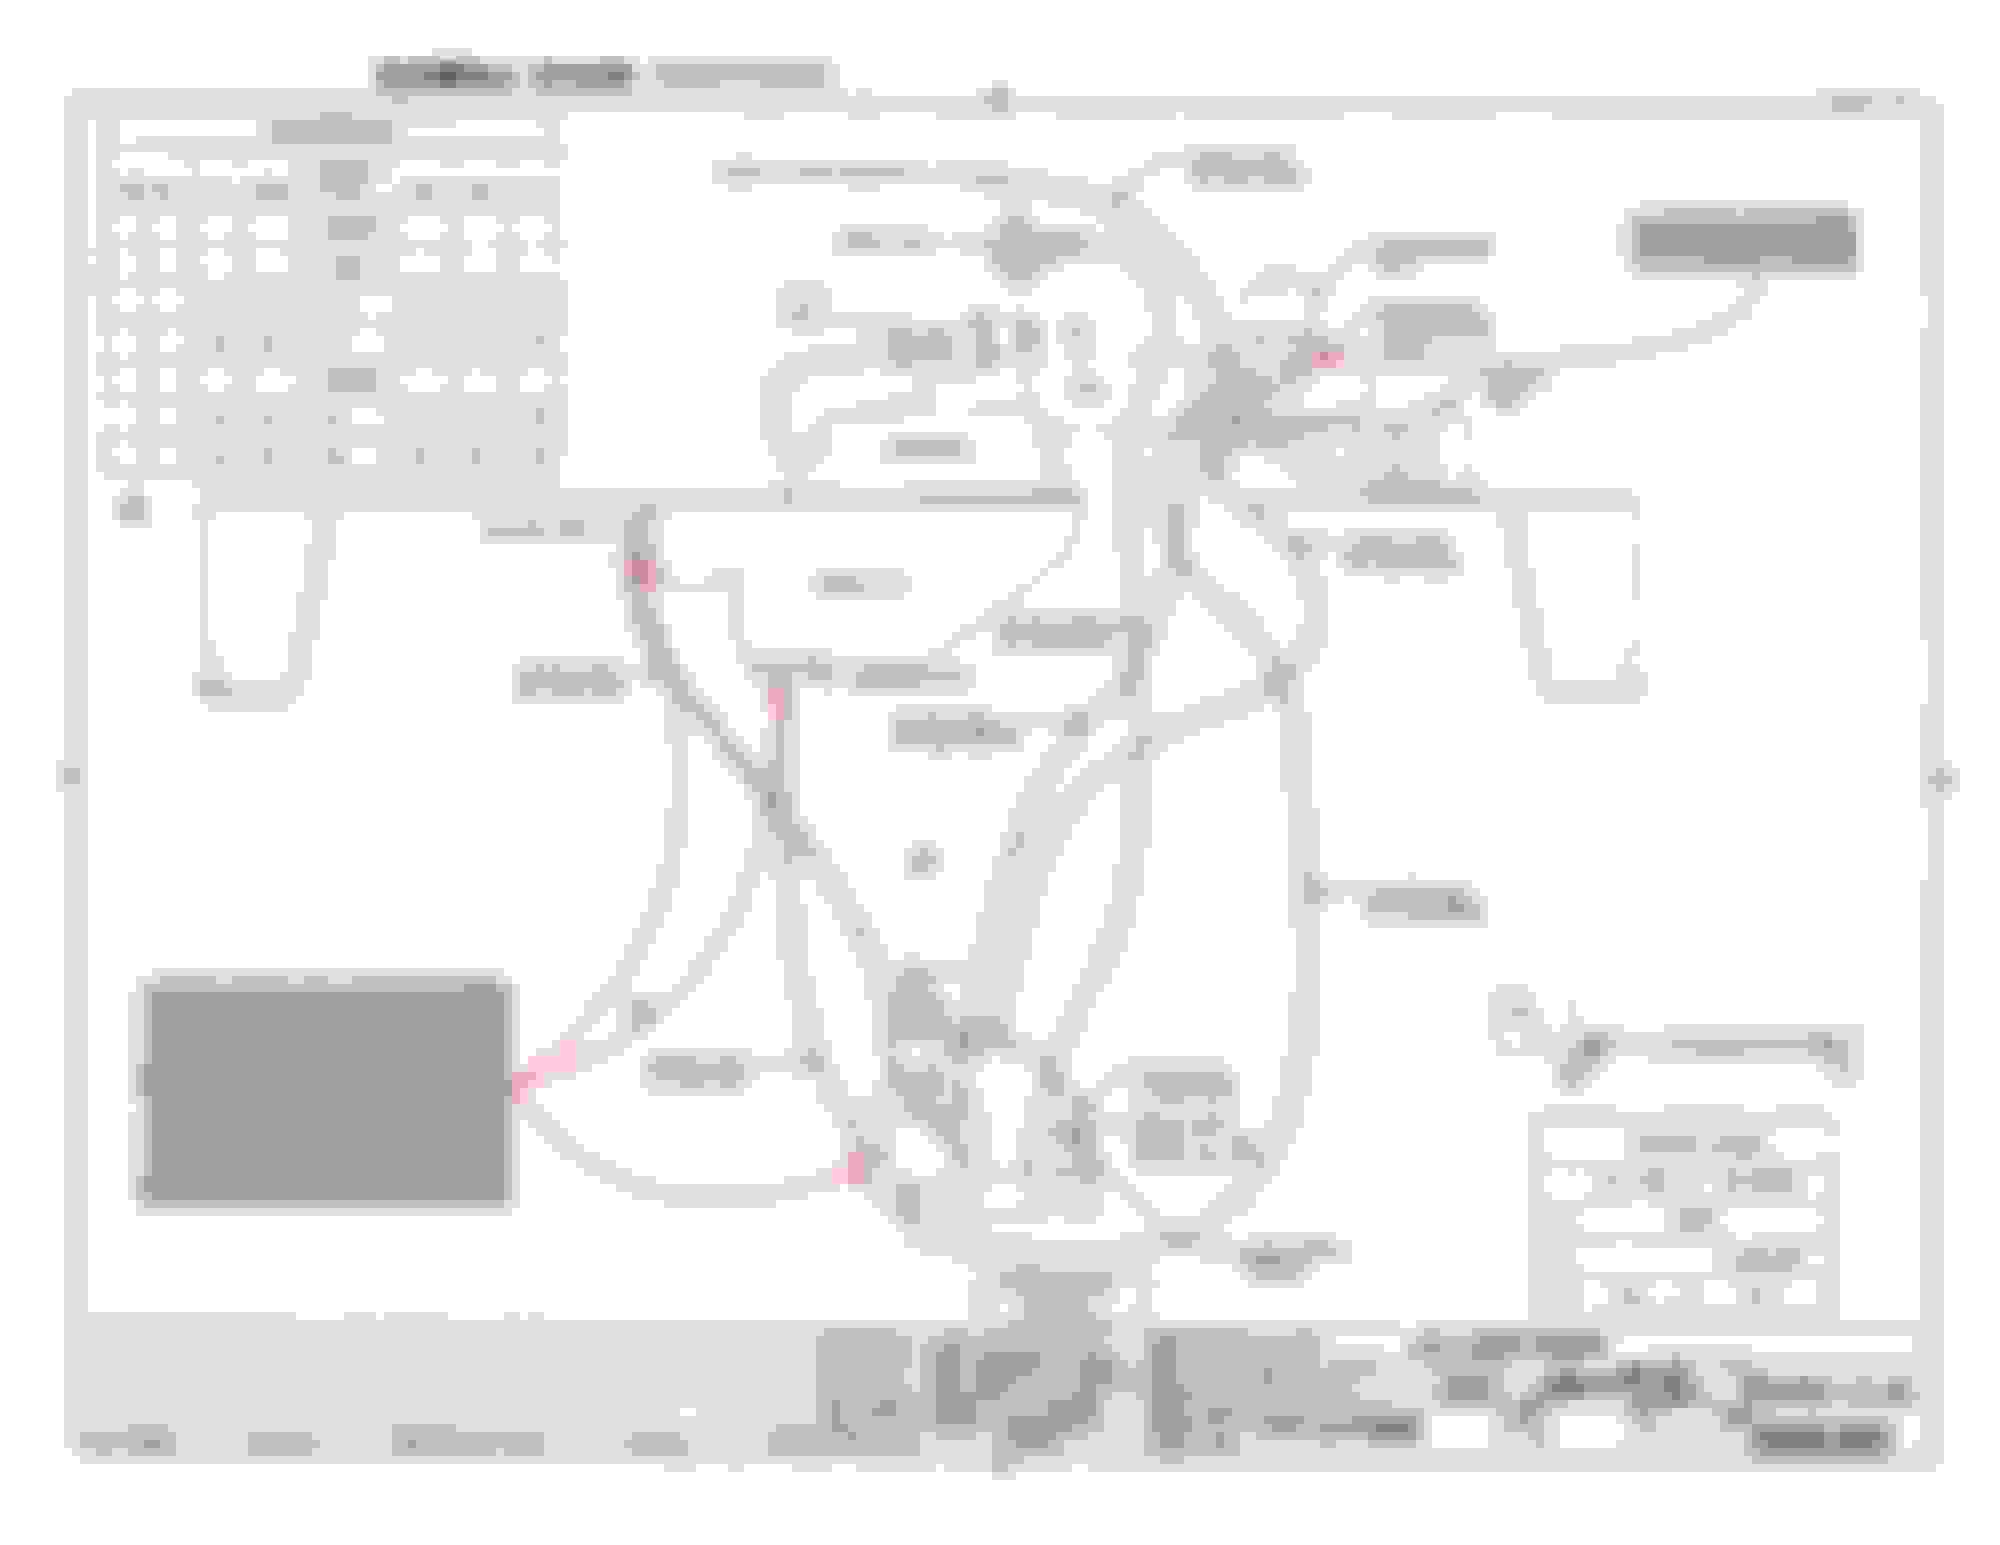
The diagrams below come from the Olds B&C body assembly manuals. I recently cleaned them up so I have some good reference documents for myself.
Just to point out a few common failure points, here's a look at the interior hoses and other parts you might want to have a look at: Gray boxes and red lines are mine, not factory. I’m just trying to guide you to the most likely problems. No guarantee this is _your_ problem.
I've found the bowden cable (the thing that moves when you move the slider from HOT to COLD) is pretty reliable. It just has to be solidly connected on both ends. If I recall there's actually spec for how much it's supposed to "spring back" at the end of its travel. Just make sure the 1/4” and 5/16” hex head screws are tight & the action is smooth. Then you can rule it out as a problem. Grease it with some light oil or WD40 if you like.
Fixing the Mode Door
The culprit you should check out for mode door problems is on the passenger side of your engine compartment. The mode door is controlled by a spring loaded door which is held upwards, unless you want outside air in, then a vacuum diaphragm pulls it downward (open) using vacuum supplied by the control unit. If I remember right, this is the Orange stripe vacuum hose. There are 2 vacuum downward facing ports on that diaphragm on the engine side of the firewall. So you have to crawl under the car on the passenger side, ideally with the car raised, to see if both ports are connected. Also check to see if the diaphragm is cracked from heat exposure over the years.
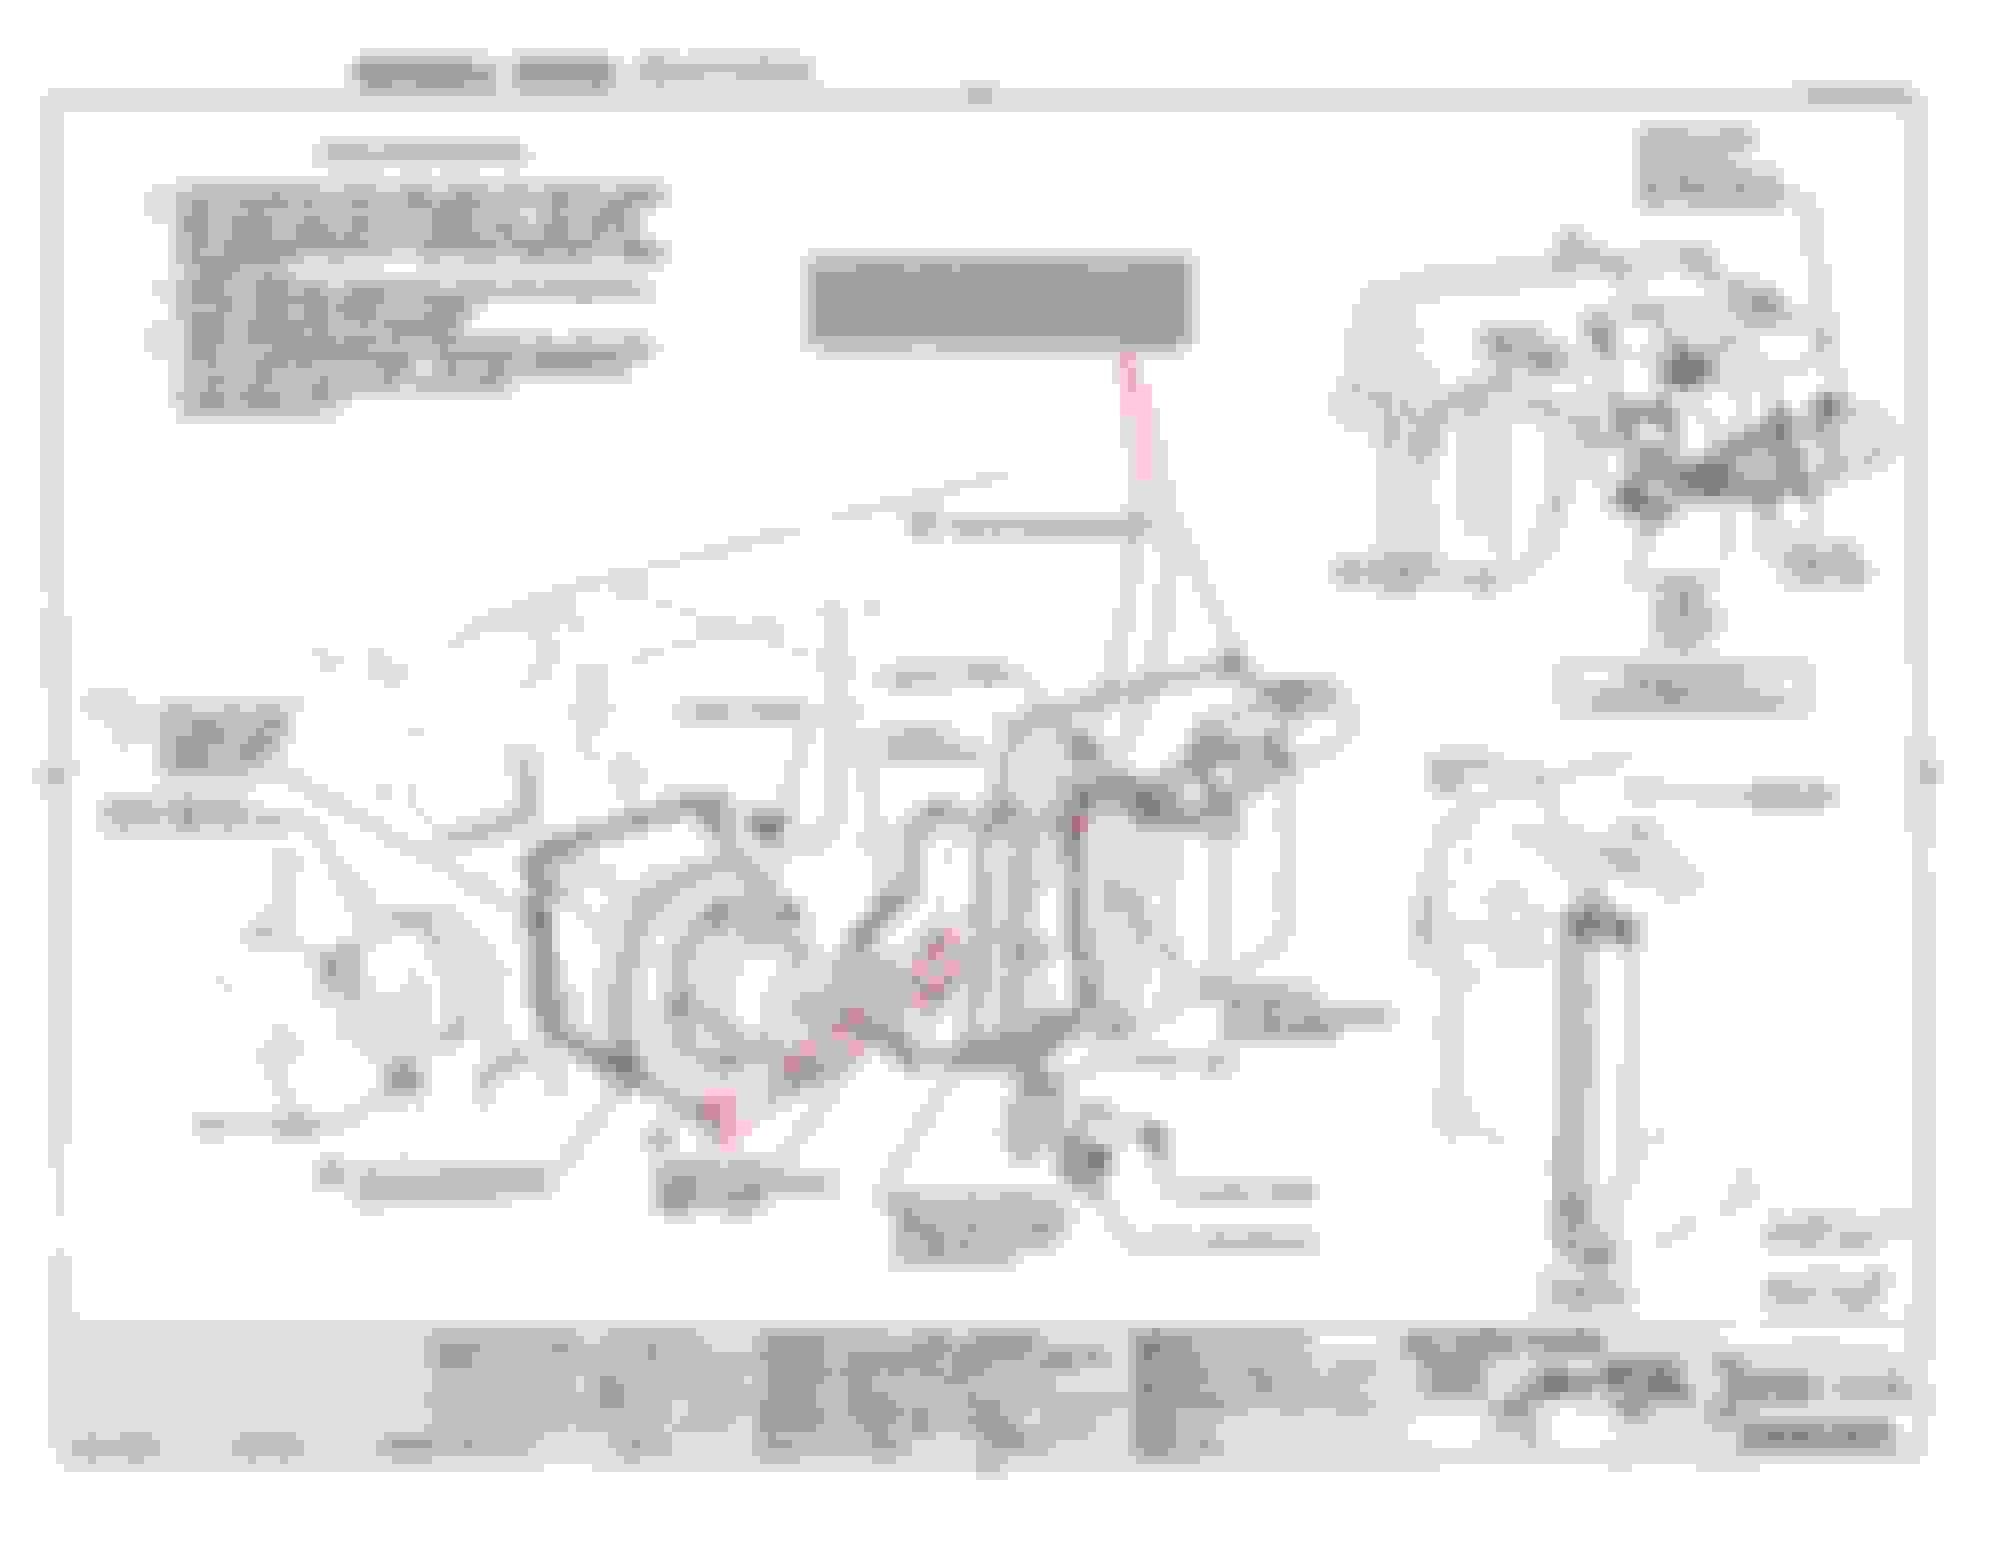
Here’s how Olds described it to their factories when it rolled out in 1965:
Factory diagram with my gray boxes and red lines. B&W is factory. Overlays are my opinions. Factory diagram with my gray boxes and red lines. B&W is factory. Overlays are my opinions.
Inspect that engine side diaphragm for cracks. It sits right above the passenger side exhaust manifold (and passenger side exhaust tube, if you have duals). The diaphragm is a bakelite/plastic part which can crack, break, or otherwise fail due to constant heating & cooling in the engine compartment.
Good luck!
Hope this helps. Good luck on restoring your A/C system. Mine works great, but with a few decades of experience, I’m glad I never had “Comfortron” A/C. It was conceptually good, but a bit ahead of its time for reliability. I’m guessing only a small percentage of those work 57 years later…
The fan should run when the vent button is pushed.
For detail on how to remove the control unit, down load these PDF's and look in Section 35C60 Closed Ventilation. The diagrams there will show you how it goes together, and how it comes apart.
If you don't have the 1966 Chassis Service Manual and accompanying Fisher Body Manual, get original (not reprint, not CDs, not downloads) copies of those books and you'll learn how to maintain the car. Troubleshooting without those books means a lot of wasted time & guess work.
I’m a hobbyist, not a mechanic, but I’ve been working on these systems for about 40 years. I don’t mess with refrigerant or compressors, but vacuum systems make sense to me. Your system is the same one I have in my '66 Starfire. Let's get into it.
Vacuum Hoses
First up, your color-striped control vacuum hoses are old. As is your piano-key control unit. While the compressor, evaporator, condenser, heater core or other major parts are pretty easy to replace, on big Olds's the control vacuum hoses are almost always original. 57 years later these vacuum hoses can leak. The vacuum leaks occur mostly where they connect to the nipples they're supposed to seal against: the stress of the seal eventually cracks or splits the rubber hose. Once the hose leaks vacuum, it pulls less hard on whatever diaphragm it’s supposed to control, or maybe it doesn’t work at all.
The real obvious cracked or split hoses ones hiss audibly when you push the key to ask them to function. So run your controller through its paces & listen for a hissing sound. It’s good to have a note pad to write down when you hear any hisses so you can chase them down.
Olds left the vacuum hoses a little long at the factory. This means is that you can snip off about 1/4" - 1/2" of any cracked hose ends and re-use the hose without much work. If you do shorten the lines, be sure to spray both the metal nipple on the control unit or vacuum diaphragm & _also_ the insides of the hose ends with silicone spray lubricant. If you don't, the next 1/2-3/4" of hose may split. Eventually you run out of color striped hose to fix...
If the old hoses continue to split, use a plastic vacuum union into the old hose, with the other end being a new hose to the control unit. It ain’t pretty, but it should work so long as the plastic union part doesn’t split the hose like the factory metal nipple did. Label the end of any generic hose with the stripe color that the factory assigned or you’ll never remember what you did on that Sunday night to fix it…
The diagrams below come from the Olds B&C body assembly manuals. I recently cleaned them up so I have some good reference documents for myself.
Just to point out a few common failure points, here's a look at the interior hoses and other parts you might want to have a look at: Gray boxes and red lines are mine, not factory. I’m just trying to guide you to the most likely problems. No guarantee this is _your_ problem.
I've found the bowden cable (the thing that moves when you move the slider from HOT to COLD) is pretty reliable. It just has to be solidly connected on both ends. If I recall there's actually spec for how much it's supposed to "spring back" at the end of its travel. Just make sure the 1/4” and 5/16” hex head screws are tight & the action is smooth. Then you can rule it out as a problem. Grease it with some light oil or WD40 if you like.
Fixing the Mode Door
The culprit you should check out for mode door problems is on the passenger side of your engine compartment. The mode door is controlled by a spring loaded door which is held upwards, unless you want outside air in, then a vacuum diaphragm pulls it downward (open) using vacuum supplied by the control unit. If I remember right, this is the Orange stripe vacuum hose. There are 2 vacuum downward facing ports on that diaphragm on the engine side of the firewall. So you have to crawl under the car on the passenger side, ideally with the car raised, to see if both ports are connected. Also check to see if the diaphragm is cracked from heat exposure over the years.
Here’s how Olds described it to their factories when it rolled out in 1965:
Factory diagram with my gray boxes and red lines. B&W is factory. Overlays are my opinions. Factory diagram with my gray boxes and red lines. B&W is factory. Overlays are my opinions.
Inspect that engine side diaphragm for cracks. It sits right above the passenger side exhaust manifold (and passenger side exhaust tube, if you have duals). The diaphragm is a bakelite/plastic part which can crack, break, or otherwise fail due to constant heating & cooling in the engine compartment.
Good luck!
Hope this helps. Good luck on restoring your A/C system. Mine works great, but with a few decades of experience, I’m glad I never had “Comfortron” A/C. It was conceptually good, but a bit ahead of its time for reliability. I’m guessing only a small percentage of those work 57 years later…
Cheers
Chris
Hi Chris,
Thank you so much for the great reply!
Regarding the hoses. I was afraid they might be cracked or split because it would require pulling everything out to fix. Everything that I can see looks really good but you're probably right about them being cracked up near the control unit. That's also great advice about using silicone spray on the hoses, I'll definitely do that.
According to my 66 service manual, the door outside of the firewall that has the dual nipple diaphragm (below the blower motor) is referred to as both the "Recirculating Air Door" and the "Outside Air Door" in the manual. When open, it allows fresh air from the cowl to enter the system, when closed, it recirculates the cabin air. The "Mode Door" (also referred to as the "Selector Door" in the manual) has a single nipple and switches the air flow from the A/C (dash) vents to the heater (lower) vents. It's located on the drivers side of the heater case cover below the dash.
Here are two pictures from the manual showing the "Mode Door" (also calling it the Selector Door). The third picture explains the Mode Door operation. You can also see the "Recirculating Air Door" section referring to the "Upper Port" of the the diaphragm. It also refers to the Blower Duct Assembly.
Anyway, I'll start pulling everything part one of these days and try to take pictures of the process. Hopefully it's just broken hose tips like you mentioned and not something wrong with the control unit itself.
The fan should run when the vent button is pushed.
For detail on how to remove the control unit, down load these PDF's and look in Section 35C60 Closed Ventilation. The diagrams there will show you how it goes together, and how it comes apart.
If you don't have the 1966 Chassis Service Manual and accompanying Fisher Body Manual, get original (not reprint, not CDs, not downloads) copies of those books and you'll learn how to maintain the car. Troubleshooting without those books means a lot of wasted time & guess work.
Chris
Wow! That's incredible that you put all of that together! Had you posted that before I bought my manual, I don't think I would have spent the money. Thank you for contributing that to the community!
You’ll be glad you spent the money on the CSM. It’s where we all started, when we get serious about these cars. I found the other stuff about 8 or 10 years ago and it took me that long to have the time to clean and organize it. But it’s very different stuff from the CSM and I find it much more helpful on the details.
Sorry if my post is referring you to the wrong door, go by the CSM and factory diagrams for sure. Once you have it apart, you’ll figure it out easily.
Couple more A/C based tips
1) If you’re removing the innner and/or outer case(s), give some thought to replacing the heater core. Over time it becomes a service item. They’re getting rare and you need the 65-66 big car one. You can find ‘em on Rock Auto, I think. The holy grail is an NOS GM copper/brass like the factory used new. The old stuff is better quality if you can find it. If you don’t know the age of your heater core, a good time to do the job is when all the stuff it sits inside is out of the car. Otherwise, one day someone will get the glycol foot bath and you’ll have a radiator leak - near or far from your garage.
2) If you want to leave the Freon lines alone, you can remove the blower fan side of the engine stuff. The A/C evaporator case builds up tons of crap (leaves, sometimes mold and just crap) in the bottom. This can make your AC smell bad. If you remove the blower and that connecting piece of plastic which holds the blower speed resistors, you can get a compressor blower, or canned air, or that good mold killing stuff blown in there and really clean it out. I hate bad smelling A/C
3) By this time the foam seals or gaskets which connect the various pieces of plastic are probably dust. You can make your own new ones with some fresh closed cell foam. I’d recommend this. If you can find black closed cell foam, it’ll look almost factory. Plus why blow cold A/C into the engine??
4) On the inside you may also find long gone foam dust seals stapled into the mode door or other places. I stapled new closed cell foam into the original holes and I think it’s working better since the door is sealing like it should.
5) If any springs are rusty, get some Evaporust and dunk ‘em in there for a day or 2. Clean is good. Don’t dunk vacuum diaphragms in Evaporust.
6) Clean the h*ll out of the inside of the case to get rid of old dust and crap. Pick your favorite water source, or chemical. For plastics, I like water and rubbing alcohol so I know it’s sanitary.
7) On or off the case parts, hand test the diagrams with a vacuum pump or your mouth just to confirm they work like they’re supposed to and don’t have any rips or tears which make them inoperative.
8) If you find gaps among plastic parts that should be sealed, get to your local hardware store and get a few rolls of 1/4, 5/16’s thick adhesive-backed closed cell foam tape. They sell it as window seals, but it helps cars too.
9) If the voltage to your blower fan is weak, or certain fan speeds don’t work, hit eBay for replacement parts - you can find the correct resistor and replacement fan switch pretty easily.
Sorry for the length, but once you get into this, completing these tasks will get you just about as good as you can get.
Oh - if the springs have worn out, sometimes you can clip off a turn or 2 and restore their “springiness”. If they seem to be working as designed, leave ‘em alone.
Also I’m pretty sure the vacuum diaphragms on both my ‘66 bid Olds are original to the cars. The quality was good in those years.
 October 21st, 2023, 04:38 PM