When you click on links to various merchants on this site and make a purchase, this can result in this site earning a commission. Affiliate programs and affiliations include, but are not limited to, the eBay Partner Network.
Probably going to post the whole saga in one thread, since there appear to be a lot of things that need to be put back to normal.
Plenty of stuff has been monkeyed with on this car, so I'll be going over everything.
Starts, Runs and Drives fine.
Current issue is a dead short somewhere in the 30 amp "courtesy" circuit. Fuse blows instantly. I'm trying to track it down.
I have found some random wiring here and there, so previous owner's shenanigans are suspected. Other than that, are there any "typical" things that go dead shorted on this car?
Also the gauge lights worked when I first got it. Not anymore. Looking into that too. That's a separate circuit I believe.
Following my assumption that everything needs some review, can somebody measure the length of their '66 transmission dipstick from the bottom of the cap to the end of the stick? Mine is really fussy to get back in the tube and often doesn't want to go all the way in.
Last edited by mike 66 toro; October 29th, 2023 at 10:10 PM.
I'm not sure if this applies on a '66 Toro but it was a frequent problem on later GM' s, the 30 amp accessory fuse would fail due to a shorted to ground cigarette lighter. It was usually the element, not the socket.
Plenty of stuff has been monkeyed with on this car, so I'll be going over everything.
Starts, Runs and Drives fine.
Current issue is a dead short somewhere in the 30 amp "courtesy" circuit. Fuse blows instantly. I'm trying to track it down.
I have found some random wiring here and there, so previous owner's shenanigans are suspected. Other than that, are there any "typical" things that go dead shorted on this car?
Also the gauge lights worked when I first got it. Not anymore. Looking into that too. That's a separate circuit I believe.
Following my assumption that everything needs some review, can somebody measure the length of their '66 transmission dipstick from the bottom of the cap to the end of the stick? Mine is really fussy to get back in the tube and often doesn't want to go all the way in.
If I was tracking down that short, I would remove the fuse and put my meter on the continuity check with the beeper. One on the fuse terminal, the other clipped to ground. If it's completely shorted, the beeper would be ringing constantly (showing less than an ohm or something like that). Then I'd pull the items attached to that circuit one by one. Easiest would be to start with the three lighters. You could also split the system at the rear body connector which is behind the rear seat (I think)......pull the spare out, I think it should be visible but don't quote me on that. When the beeper stops, you're on the offending circuit.
30A DOME/CTSY fuse runs the clock, the courtesy lamps, the front cigar lighter and two rear ones, and finally the rear quarter lamps. Does the courtesy switch change anything for you?
When I get home tomorrow I can check the dipstick.
Last edited by ourkid2000; October 27th, 2023 at 01:50 PM.
If I was tracking down that short, I would remove the fuse and put my meter on the continuity check with the beeper. One on the fuse terminal, the other clipped to .
Doing this now. I get 1.4 ohms and a solid beep, so i dived (dove?) Into the dash. Yikes. Tried disconnecting clock first, rear and front cig lighters next, radio, no luck.
Last edited by mike 66 toro; October 27th, 2023 at 08:08 PM.
You didn't try the lighters first? Just pull those cigarette lighters out one by one before you get too carried away there. It might just be one of them.
You didn't try the lighters first? Just pull those cigarette lighters out one by one before you get too carried away there. It might just be one of them.
I did actually, firgot to include in first msg. Edited to add those and more I checked now.
When the beeper stops, you're on the offending circuit.
30A DOME/CTSY fuse runs the clock, the courtesy lampswhich/where are those?, the front cigar lighter and two rear ones, and finally the rear quarter lamps. are these the ones in the c pillars? Im not sure how to access those. Does the courtesy switch change anything for you? It doesn't.
When I get home tomorrow I can check the dipstick.
Do you have the CSM? You should grab one if not, it will help you a lot with this. I think the wiring diagram for the 66' is in the electrical forum in the sticky. Might help a bit too.
In any case, the courtesy lights are the ones under the dash on the LH and RH sides. Some of the wiring for those should be fairly easy to inspect with those as you can pop the whole light assembly out. Can easily check for simple chafing, take the bulbs out, etc. Try the easiest stuff first.
The rear quarter lamps are in the rear pillars. Those lights are post-rear body connector which should be near the spare tire in the trunk. You can disconnect that harness there to take the quarter panel lamp wiring out of the equation and see if your fuse still blows (or the beeper goes off).
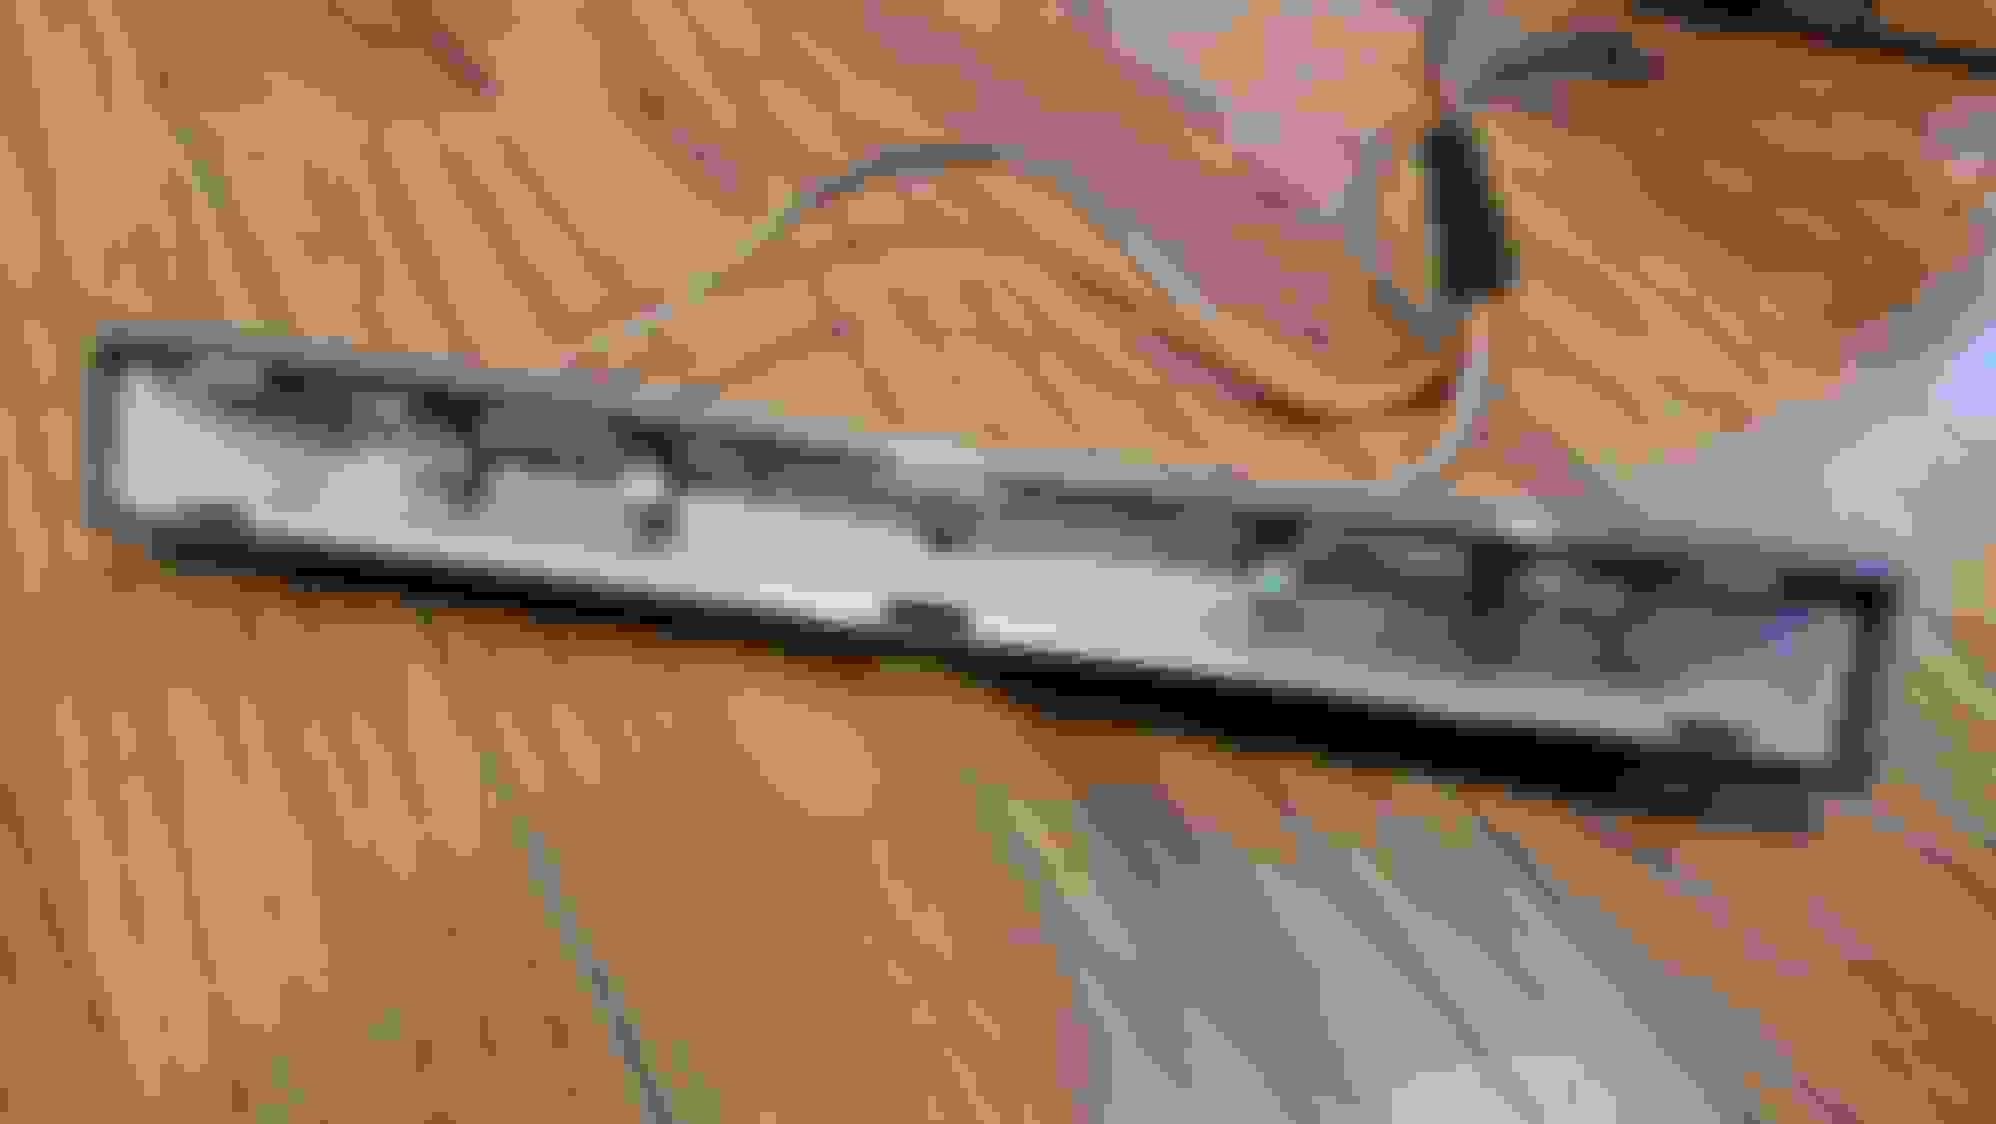
Rear body connector (trunk)
Rear body connector - not my car, pic from internet
As an additional item, try what I'm suggesting with the doors closed. It may be picking up the ground path through the door switches, throwing you off.
That connector in my 66 big cars is for the taillights, fuel sender, trunk lamp, rear license plate lamp & reverse lights.
I don’t believe this connector connects to the rear quarter lamps in the big cars, but it may in the Toros. Check the schematic for the rear quarter light connection. In my cars the rear quarters are orange/black if I recall correctly.
If you determine that the rear quarters are fed not through that connector, but from the other flat cable from under the dash, I’d recommend disconnecting the trunk lamp bulb in case someone stuck the wrong bulb in there. Same advice for the reverse bulbs which should be 1156. Brake turn lights should be 1157.
The great part is you’re close to the problem, you’ll get it. Just a matter of time & unit testing.
As you go through, since the car is new to you, now is a great time to be sure all the bulbs are what the factory intended. That’s the starting point. As you dig in, look for burned wires, broken wires & melted insulation. Mark the problems if you’re not going to finish in one go, then return and fix when you have time.
Minor other tip, use a dremel wire wheel brush to clean contacts wherever you can. Also try Deoxit 5 to remove oxidation and improve connectivity.
I like bright lights for brake/turn and reverse lights. I use 3157 bulbs for brake/turn and 3156 for reverse lights - they’re brighter, but last less long. That’s o.k. By me.
This section of the 66' schematic is problematic as there's obvious misprints, or errors if you will, that could possibly throw you off. The rear body connector shows a black and white wire at the top of the connector going to nowhere. It also has one of the tail lamps on it's own circuit which has to be some kind of misprint. I checked the diagram for the 1967 Toronado and both of these errors were corrected so I am assuming it's just a 1966 publication error. The 66' manual shows 8 wires going through that rear connector but in the photo Mike has posted above, I only count 7. The 67' manual shows 7 wires so I think we can safely assume that the 67' schematic is correct.
In any case, the diagram appears to be correct for the circuit we're discussing anyway, so then the only items on the circuit in question which could be causing the short would be the wiring to the rear cigar lighters and the rear quarter lamps. Those are the only circuits on the DOME/CTSY fuse that go through the rear body connector.
Check the wires on the disconnected connector for continuity to ground. The quarter lamp connections and the rear seat cigar lighters both run on the orange wire. If I'm correct, that should be the one causing the short.
I just checked my car and these wires appear to be the cigar lighter and rear quarter lamp wiring. They come off the rear body connector into their own harness. This connector isn't shown on the wiring diagram (so that's another error). This picture isn't my car but mine is exactly the same (any pictures I find on the internet I save them for reference).
You should be able to disconnect this connector to help further narrow things down. Hope this helps!
Thanks for the pictures and update on the misprint in the wiring diagram. Good research. The wire to nowhere could be provision for an optional package like the rear window defroster or something like that. The orange/white is the rear quarter if it’s like my big cars. If your rear cigar lighters are also not working you’re on the right track.
First check all the courtesy light bulbs for 2 pin bases. I forget the number, but rear quarter lights are triggered both by the light switch and by the front door courtesy light switches if it’s like mine. Sometimes owners put in single pin bulbs which work, but not well and sometimes break stuff. Once you get the right bulbs in them, test.
If they’re still shorting, my next move would be to check for a short in the front door courtesy light switches.
These are the 2 bayonet switches on the body side of the front doors. Every time you open and close the doors, they physically move the orange & white wires behind the kick panels in a little void which sends voltage to all the bulbs in the courtesy light system. The wires to those switches are thin and can eventually fray/break and/or ground against the frame in those voids blowing fuses all the time. The fix is 4 new, female, well insulated connectors to the factory switches. Usually the driver door is the problem since it gets used the most. But if you’re fixing it, might as well insulate the passenger side too. Even a little bit of electrical tape over the void edges will help.
Down the road, if you’re not a smoker, see my post on replacing the rear cigar lighters with USB outlets.
On second look, your “mystery switch” is very likely the front door courtesy light switches.
Nahh, that is covered on the diagram here:
I mean, it certainly could still be referencing the same switch OR a function built into the headlight switch or something but a label would have been nice, LOL.
I’m a bit out of my depth on the Toro’s but a lot of what Olds did in the early-mid-60’s, they applied to those brand new cars.
The big cars have a 3rd interior light switch -beyond the door jambs and beyond the light switch which activates the courtesy system called the “Map Light”.
On the PNG file above, the Underhood Lamp Switch is a mercury switch on the driver’s side of the hood on the underside. The glove box lamp switch is a bayonet switch very similar to the door jamb switches.
Is there a “Map Light” in the Toro’s? Sorry I just don’t know the model that well.
One thing I’ve picked up along the way in business and fixing these cars is that in production year 1, there are a lot of changes as the early models get out into the field and feedback on performance comes back. Production year 2 usually applies those lessons and by production year 3, they usually have the kinks worked out. One of the reasons I tend to buy year2 or year3 cars: they’ve learned what to do and what doesn’t work.
The road ahead is making sure your bulbs are all correct to factory spec, then look for connectors which you can disconnect to do unit testing with your test light or multimeter (beep!). You’ll get there, just be patient, keep notes on what you’ve tested so that when you walk away at 11:00 p.m. on a work night, you can go back a few days later and not cover the same ground(s). <—ha, ha,.
Apropos of nothing, when I was sitting airplanes a lot for work, I scanned the diagram and eventually redrew the whole thing in photoshop incorporating the electrical changes I’d made along the way.
I don’t recommend this unless you’re bored, planning a lot of changes or are particularly interested in tracking your electrical systems changes. It worked for me, but was entirely too many hours.
But, boy, it killed a bunch of otherwise dull hours over the Atlantic, Pacific and other places….
Ok, I unplugged the 2-pin connector (orange and white) and the short is gone. We have shenanigans in the trunk though! (picture)
It looks like a previous owner made a hole in the top there and routed a wire through? This can't be factory. Also the loose orange wire was soldered to the other orange wire. I disconnected that for testing, but it didn't remove the short. I also tried jiggling everything around.
I think I'll need to remove the seatback if I'm to find the issue and get my rear quarter lights working.
Wait till I share the mess that's behind the dash. Just getting started here folks....
Wires to nowhere, random looking splices, and cut off vacuum hoses.... Stay Tuned
Last edited by mike 66 toro; October 29th, 2023 at 10:01 PM.
For the shenanigans you’re seeing, you’re may be considering pulling the entire interior.I’d recommend that just so all the previous sins, uh modifications, are laid bare.
Once you can see the problems, they’re pretty easy to fix, but unless you can see them, they’ll plague you forever. One of the best things I ever did on both my big cars was to pull the whole harness - which is modular - and get it on the bench. Then you can _really_ troubleshoot and be sure everything is as the factory or you intend it to be.
Plus once the interior is out, you can really clean & polish the panels, seats and so on, regrease all the window tracks, clean the door and quarter bottoms of 55 years worth of leaves and crap. That’s also the time to put in modern sound deadening materials, route in some extra wires of your own for a modern stereo and whatever you want. I added a bit of sound insulation between the trunk and cabin at that point too.
Looking back, some of the most fun times I ever had were doing the wiring & vacuum infrastructure on these cars. If you enjoy this kind of work, make a point of taking time to both enjoy it and get it exactly right. If you don’t like it, troubleshoot as needed and get to the stuff you do enjoy.
One of my back burner projects is to do a write up about how to repair these harnesses. If you need it sooner rather than later, let me know. I wrote an early version years ago, but it’s time to get it on CO with pictures and references.
The back half of the interior has to come out. Seat cushion first, then armrests, then upper quarter trim pads, then the seat backrest, then the moulded plastic shelf. Then the sailpanels can come out and you can access the sailpanel lamps and wiring. Battery disconnected!
I had always thought Toronado weren't subjected to POS as badly as the A-body cars were, but yours and BSieg's are proving me wrong.
You might want to get a 1966 Fisher Body Manual since the body wiring routing is covered in that, not the CSM.
Last edited by rocketraider; October 30th, 2023 at 09:13 AM.
The back half of the interior has to come out. Seat cushion first, then armrests, then upper quarter trim pads, then the seat backrest, then the moulded plastic shelf. Then the sailpanels can come out and you can access the sailpanel lamps and wiring. Battery disconnected!
I had always thought Toronado weren't subjected to POS as badly as the A-body cars were, but yours and BSieg's are proving me wrong.
You might want to get a 1966 Fisher Body Manual since the body wiring routing is covered in that, not the CSM.
LOL, just wondering what POS means? Askin' for a friend. *Edit.....dohh, I get it. Previous owner syndrome haha. I'll tell my friend
Previous Owner's Stamp. Or Syndrome as Mike calls it. Common affliction of old cars, seen more on Chevrolet and Pontiac A-body cars in GM-world, Plymouth and Dodge in Mopar-land, and any and all Ford products.
And usually electrical-related!
Course POS could mean something else, but still the same general meaning.
Appears the positive contact was touching the reflector (pic). PO must have pushed too hard installing a bulb, as the socket was pushed out of position, allowing contact.
I'll route all wires intelligently, check the other quarter light, order warm white led bulbs for them, and add an extra wire pair for the rear speaker (it iis common ground now) and be done back there.
There's a second pinswitch on each door, and one on the trunk. Guess someone installed an alarm at some point. 👀
Moving on to dash next... steadily curing POS.
Last edited by mike 66 toro; October 30th, 2023 at 10:57 AM.
How cool is that! Great work Mike! I'm very glad you got to the bottom of this pretty quickly. I would love to see lots of pics of the rear with the seats and such removed. This is something I plan on tackling next year (pulling the seats, replacing carpets, etc) and lots of in-progress pictures are super helpful.
Looking back, some of the most fun times I ever had were doing the wiring & vacuum infrastructure on these cars.
First time working with so much vacuum gadgets. I enjoy it, I just don't know why someone messed it up so much. I'm going to need a complete vacuum diagram, which I hope is in my 66 manual and is accurate.
Originally Posted by ourkid2000
How cool is that! Great work Mike!
Thanks! Sadly I did not take photos in progress but these sorts of things tend to burn into my memory. Will take more in future. I'm not sure my vehicle is a good reference. There was one and a half screw barely holding in the whole seatback, and nothing holding the rear shelf in place..
More curiosities:
I feel like this is not what should be in passenger footwell for lighting. Can someone take a photo looking up at that area? it's held on by a big bolt and interferes with the trim piece.
Last edited by mike 66 toro; October 30th, 2023 at 03:47 PM.
Those light fixtures are never held on by a big bolt. All the factory ones I’ve ever seen are held in by a 1/4” hex head sheet metal screw, usually dark ones.
Review those pin switches. I guess it’s good that someone cared enough to install more, but I’d get the whole thing back to factory before moving on to modifications.
My ‘66 S/F had a bayonet/pin switch on the radiator support to sound an alarm if the hood was opened. It’s been just a hole for 25 years or so. I got rid of the extraneous junk in the 90’s.
Just in case you wind up replacing any of that vinyl, Olds called it “Morroceen” or some dumb marketing name.
The restoration industry knows it as Madrid Grain Black. Also you can get the shiny vinyl pseudo-chrome trim in rolls from places like TAP Plastics. In case you want to get creative. Or replace-i’ve…
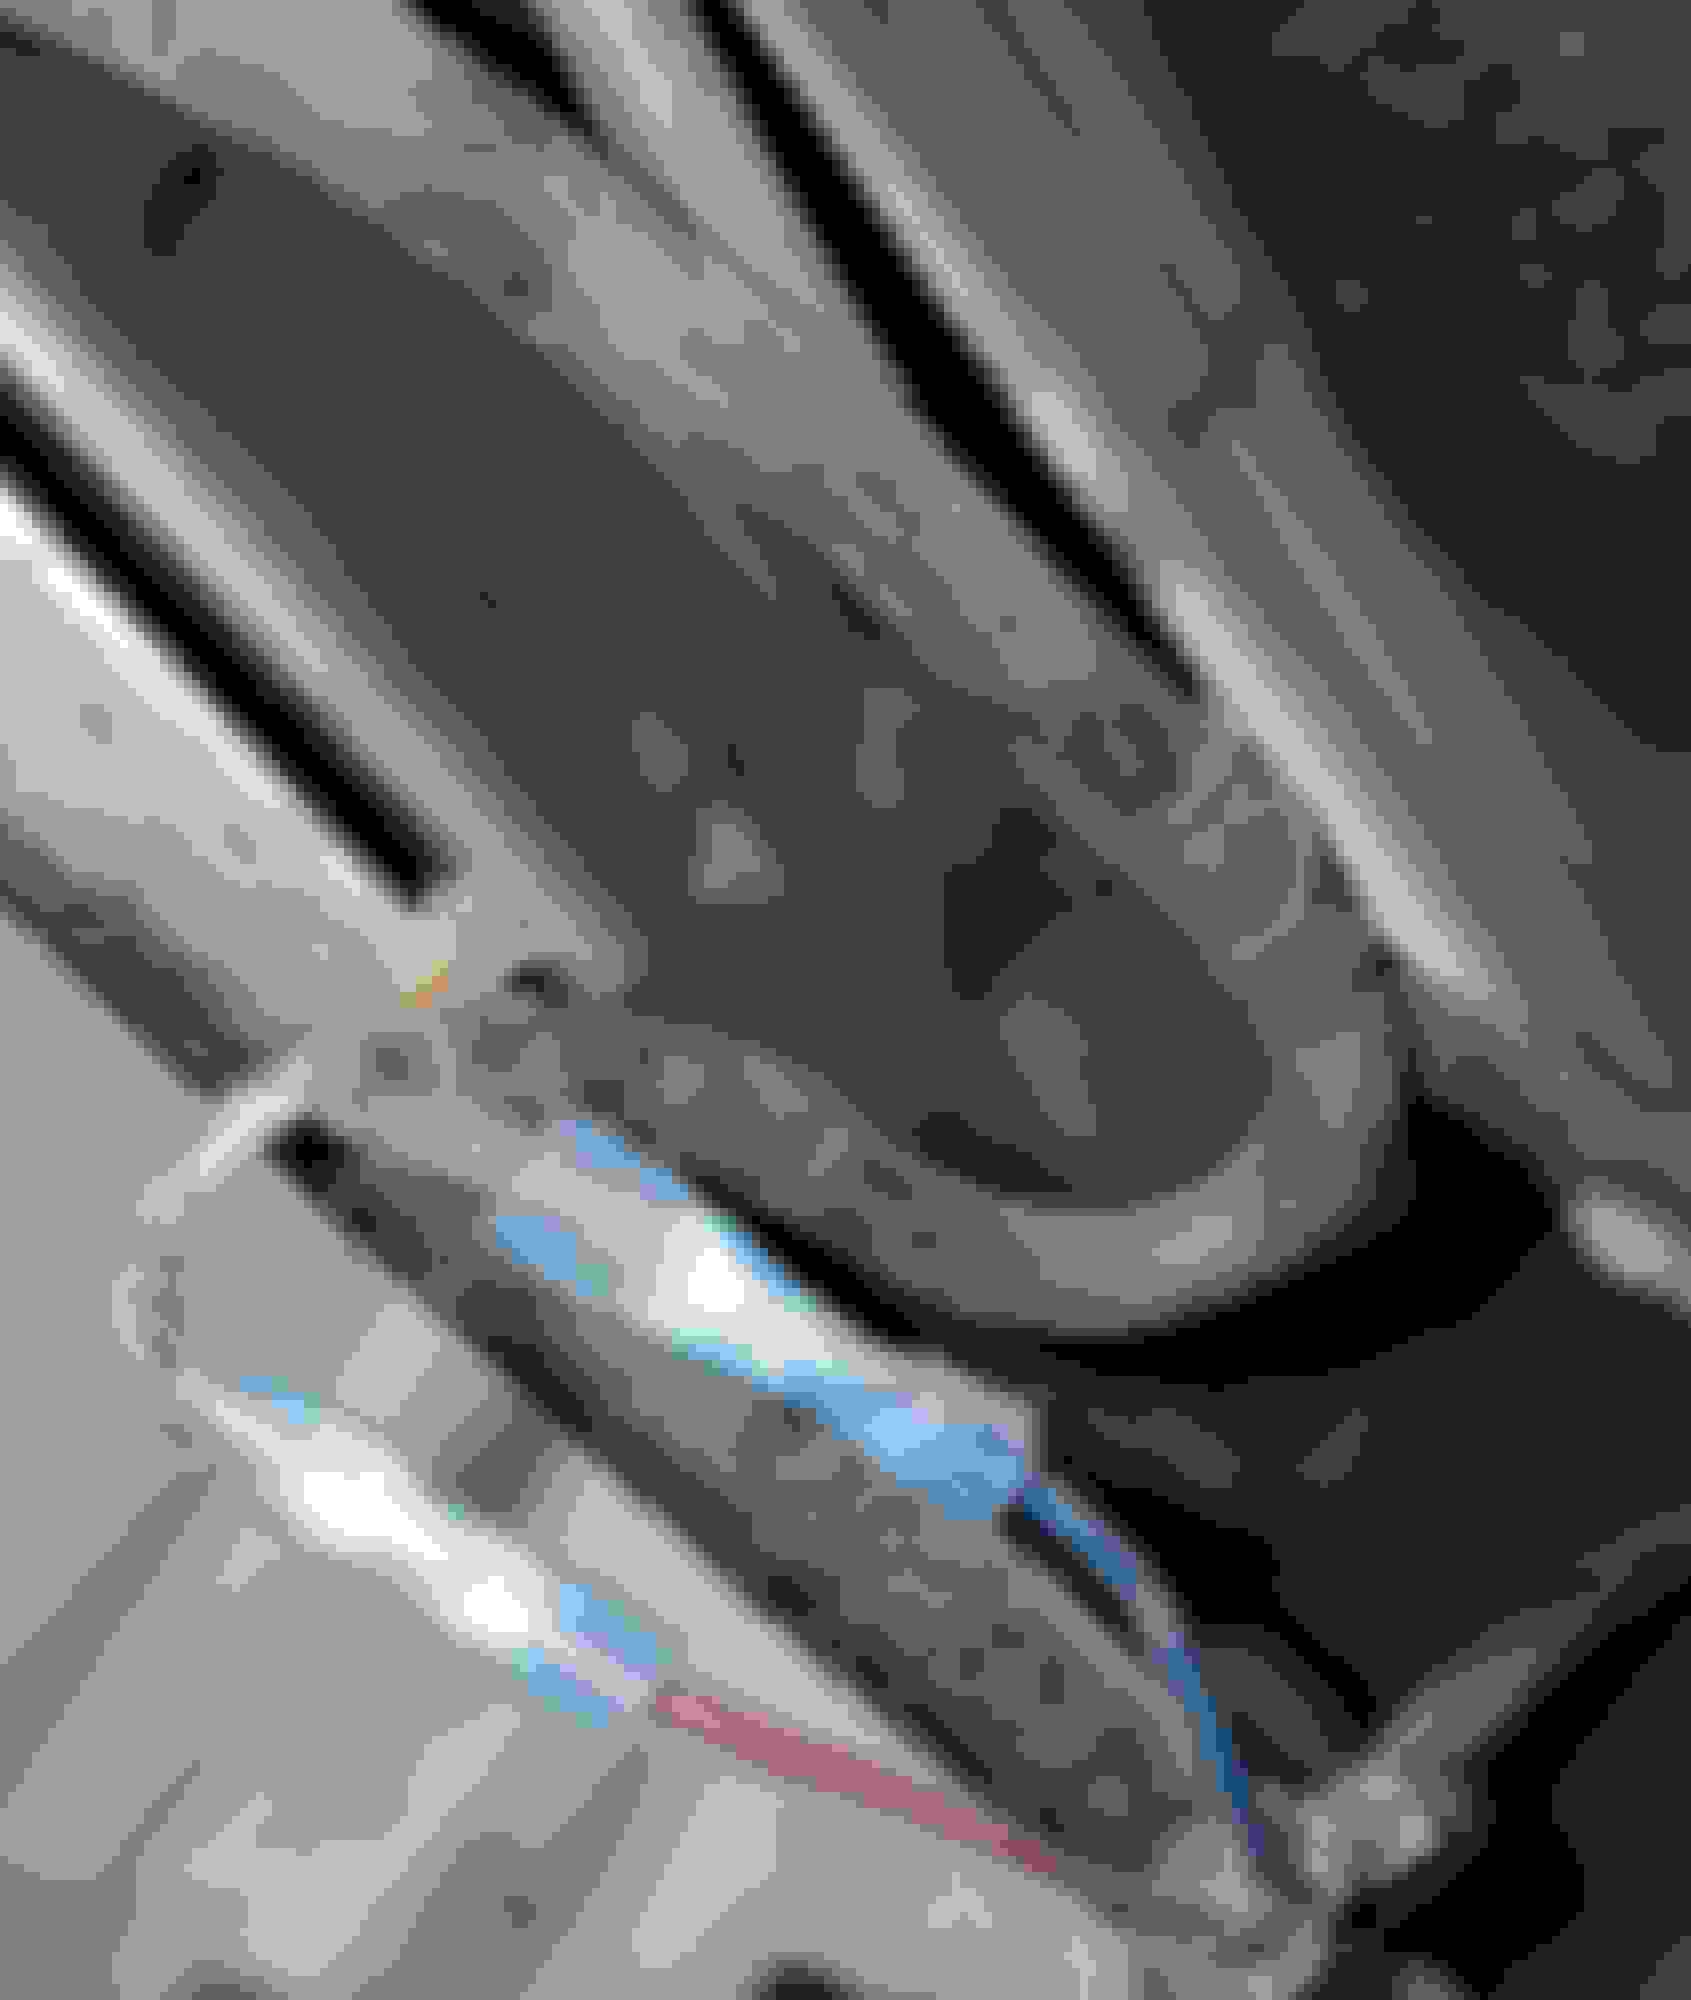
That is a pulse reducer and the orientation is just off. The flat spot allows the pulse reducer to snug up tighter against the fuel pump......for more clearance. It just needs to be loosened and turned. Looks like a fairly new fuel pump, the person who installed it just has it orientated wrong.
I could be wrong about that so I can double check this when I get home tomorrow. My pulse reducer was discarded as it's not necessary with the new fuel pumps. I'll check for the cut away.
Last edited by ourkid2000; October 31st, 2023 at 08:54 PM.
For the record, the pulse reducer is well documented in '66 Olds 425 lore. I believe it was a one year only part.
Unless I miss my guess, the idea was to even out the pump pressure to the carb to create consistent pump pressure PSI to the (then very new) quadrajet carb with a rubber diaphragm that would absorb some of the pump pressure variation with occurred with changes in RPM. I surmise that Olds figured out they just weren't necessary after a while.
My '66 cars never had them in all the years I've owned them. I've never missed them in 40 years with these engines. My Dad was the original owner of my 98 convertible, as far as I recall back to the 80's, that car never had one. It could have been removed before I really got to know that 425 though. I believe the pulse reducers were more commonly found on A/C cars. My '66 Starfire has a ~1970 455 and never had a pulse reducer even though it's an A/C car. It does have the 1/4" fuel return line though.
All these years in, I'd try running the engine without it. Mechanically it may help, but as a 57+ year old rubber diaphragm fighting today's ethanol "enhanced" fuel, it feels to me like a fuel leak waiting to happen. Especially if someone had to grind it flat to get it to fit a factory engine...
That is a pulse reducer and the orientation is just off.
Understood, thanks!
Originally Posted by cfair
feels to me like a fuel leak waiting to happen
Yep!
Believe it or not, there is even more wiring nonsense to report. The front amber lights aren't working.
There are three splices in the wiring for the lights... Try to follow along...
The first one is using squeeze-on wire taps, which were then wrapped in tape. The second is using crimp-on butt connectors, and tape. The first splice leads us to random wire colors and sizes, and the aforementioned tape. The second splice leads us to a salvaged flexble appliance cord. The third splice seems to get us back to the correct colors. All of the splices are too long, of course, and zip-tied or taped or wrapped around random things. The appliance cord runs across to the passenger side light, where we of course find more splices..
Previous Owner Syndrome continues... Photos attached for your amusement.
Splice 2:
Splice 1:
splice 3:
Last edited by mike 66 toro; October 31st, 2023 at 11:32 PM.
I may be sheltered but I have never seen a Toronado with this much buggered wiring.
Where in Central Virginia did you find this car? That wiring has Pittsylvania County written all over it. I like electrical work and have seen some wild stuff, but even I am sometimes stunned at what jacklegs will do to get electrical stuff going. The lamp cord you found is a prime example.
Attack it methodically as you've done on the rest of it, make the repairs in a workmanlike manner, and Torosaurus will again work properly.
You can still get a lot of the original style GM plugs and connectors. At one time you could find them at NAPA or even AutoZone. Joe Padavano knows several good sources for them. It's a little harder to find correct GM colors wire but it's out there.
The circular thing off to the side is about 2 millimeters from the belt and looks like it was grinded for clearance.
I checked mine this morning and it looks like there is a small flat spot that allows the pulse reducer to sit closer to the fuel pump, however, it isn't nearly as pronounced as yours.
I may be sheltered but I have never seen a Toronado with this much buggered wiring.
Where in Central Virginia did you find this car? That wiring has Pittsylvania County written all over it. I like electrical work and have seen some wild stuff, but even I am sometimes stunned at what jacklegs will do to get electrical stuff going. The lamp cord you found is a prime example.
Attack it methodically as you've done on the rest of it, make the repairs in a workmanlike manner, and Torosaurus will again work properly.
You can still get a lot of the original style GM plugs and connectors. At one time you could find them at NAPA or even AutoZone. Joe Padavano knows several good sources for them. It's a little harder to find correct GM colors wire but it's out there.
When it comes to the old Packard connectors, I went to a local pick and pull. They had a few mid-80's Chevy vans there which appeared to be luxury conversion vans. I was very surprised to find that there was lots of Packard 56 connectors still in use on these things so I grabbed as many as I could find and ended up using them all. I just de-pinned them, cleaned them up, and crimped my own new terminals for my own harnesses and put the connectors on. I'm up in Canada where most of these era vehicles are LONG gone. I bet in the USA you'd have much more luck finding that stuff.
With regards to the wiring and getting the correct colors, I just hacked out a bunch of random wiring harnesses from old cars at the yard and you can pretty much take your pick of any color you need. Just had to make sure the wire gauges were good. That's a great source of wire, loom, and little clamps, clips, etc.
Don't do like I did though......I left a really nice set of Klein cable cutters in that junkyard. Long gone now.
Last edited by ourkid2000; November 1st, 2023 at 08:52 AM.
 October 27th, 2023, 11:15 AM


 it's held on by a big bolt and interferes with the trim piece.