When you click on links to various merchants on this site and make a purchase, this can result in this site earning a commission. Affiliate programs and affiliations include, but are not limited to, the eBay Partner Network.
Have had this car for about 10 years and well she was just tired. 2 previous repaints with the last one severely lacking in quality. Car was from Texas and in really nice shape - only real trouble spot is a poor partial floor replacement. Goal is to have this done in a year, but when only getting a day a week it�s going to be challenging. 455/400/3.42 12 bolt all ready to go. Chassis going back together with Wilwoods all around. All removable body panels blasted and primed. Next is the body and not sure what I want to do with three coats of paint. Deciding between blasting, chemical paint stripping, Eastwood contour SCT tool or a combo. Tried paint stripper and it didn�t really make a dent. Probably going to put it on my rotisserie and have it blasted, I just worry about all the places the sand can hide. My guy is pretty good, but still. Going back with the original blue (code 55 Tahitian Turquoise) with white stripes.
Thanks, when I left my beloved Texas and moved to Fl my wife and I agreed she could get a nice barn for the horses as long as I got my shop! I stay out of the barn, but she seems to not reciprocate!
I got the front suspension buttoned up and the brakes on. Using a BMR 1 1/4” front sway bar and it’s hitting the idler arm. I have it moved as far forward as I can. Anyone else had this issue?
Engine is ready to go in, but this weekends project is brake lines. Using steel 3/16 with -3 AN fittings and 37 degree flares. Interested in seeing any pictures of how you all have done your lines.
Looks like your brake lines are in, but here are some pics anyway. The header clearance is a little tight, but temp has not been an issue so far with high temp wilwood fluid. I used 3/16 with 3 an lines for everything but the main line going to the rear which is 1/4 4 an. If I was going to do it again, I would run 3/16 for all of the lines as I had trouble finding some of the 4 an fittings.
Thanks for the pictures, is that a classic performance street beast booster? Thinking about getting one as I don’t have enough vacuum and I don’t like the vacuum canister setup I have. I have read good reviews on the street beast. Also, I notice a magna flow exhaust system. Is it one of the kits they sell? I bought one and in the process of installing. Nice kit for $700 from summit.
I had the same problem. The car was originally a 350 2brl. I was running 98 Camaro brakes on all for corners with a Camaro master cylinder and the original vista cruiser booster. That combo worked awesome. When I tore the car apart for the LS swap, I upgraded to the 14"/13" Wilwood setup. There was not enough room for the 11 inch booster after the LS was in so I went to a 7 inch dual diaphragm with a summit electric vacuum pump and reserve vacuum tank. The cam /throttle body / intake combination on the LS makes almost no vacuum so even with the electric pump and tank the brakes were terrible. When I added the hydro boost, I put on a used booster from a newer F250 like this one:https://www.ebay.com/itm/Ford-F250-P...4AAOSwNyRfHzXm
I used an early C-10 conversion plate like this one: https://www.ebay.com/itm/1967-1972-C...-/293059037395 and a set of CPP banjo fittings: https://www.ebay.com/itm/6AN-6-AN-Ba...-/264602389651
I had to cut and thread the inside shaft on the F250 booster and grind a very small portion on the master cylinder pin off as it was a bit too long for the Wilwood master cylinder. I also had to open up the hole on the firewall a little bit so the nut that holds the booster to the mounting plate would fit through. I had a hydraulic shop make me the two pressure lines (pump to booster and booster to steering box) the rest of the lines are all ptfe -6 lines that I made myself. I did have to cut about 1 inch off the bottom of the C10 mounting plate and drill new lower holes to mount it on the vista cruiser. The biggest problem I had converting to hydro boost was my power steering reservoir. I was running a small remote reservoir for the power steering. When I upgraded to hydro boost, I also had to upgrade the pump for more flow. This along with the new booster caused a lot of cavitation in my small reservoir and "spit" power steering fluid out all over my left inner fender. The only solution I could find was to upgrade to a PSC remote reservoir for hydro boost: https://www.pscmotorsports.com/motor...-sr146hor.html
I also added their pressure relief valve. This solved all of my issues but at $310.00 it nearly doubled the cost of my install. I paid $75 for the used booster, $40 for the C10 mounting plate, $30 for the banjo fittings, and $140 for the high pressure hydraulic lines $285 plus the materials for the ptfe lines, a power steering cooler, additional inline filter, and a new high volume power steering pump put me just under $500 so about $800 with the new reservoir. If you are going to use an early style pump with its own reservoir you probably will not need the PSC unit. and you should be able to put a system together for less than $400. You will not regret going to hydro boost! My car stops awesome now. I assume you will be running an adjustable proportioning valve to set the rear brake bias. If you are running a remote reservoir, I would highly recommend the PSC reservoir. Here are some pics of the system:
In the pic below, you can see the old reservoir that caused cavitation in the system
You can see the power steering cooler in this picture mounted vertically right next to the drivers headlight surround. The larger cooler in front of the condenser/ radiator is an auxiliary trans cooler
Here you can see where I cut and threaded the booster rod to accept the factory mount
Here is the PSC reservoir installed. The remote vent is mounted in front of the radiator.
For the exhaust I started with a cheap 2.5" off brand stainless X pipe kit, I added the Magnaflow mufflers and a pair of 2.5 inch stainless Flowmaster rear tail pipes for a cutlass. I had to weld some additional sections in to make it all work as the vista is a long car. The Flow master rear pipes are pretty nice, but don't fit the contours of the vista floor all that well and I will probably redo them at some point. I am pleased with the mufflers so I am sure you will be happy with the builder kit.
Looks like your car is going to be pretty awesome when it is finished. I am running UMI front and rear sway bars along with their upper and lower rear control arms like I see on the back of your car and I am very pleased with them. It is a big heavy car and it goes around a corner like it is on rails. Here is a thread I started on my vista. Not a ton of pics as I did not take many along the way: https://classicoldsmobile.com/forums...ruiser-148770/
Last edited by Loaded68W34; October 22nd, 2020 at 11:56 AM.
Man, thanks for all the information and I love the attention to detail in your build. Clearly a well thought out build! I am going with the hydro boost and older style Saginaw pump.
Finally kicked off the body works. All removable panels blasted and primed. Three coats of paint so I decided to paint strip the body instead of blast. So far so good, 90% stripped and starting to sand off the remaining....
While the body progresses, I picked up my next project, but this one I can at least drive now. Will be upgrades only. CutlassFi building my small block stoker for it and I m going with a 4 or 5 speed.
I already had the dog just coincidence that they are both white
Awesome build! Nice to pick up another project that you can enjoy while you are finishing your build! I have two projects in process (1970 Olds 442 frame off and 1962 Corvette resto-mod), neither of them is drivable and was about to pick up a third project when my wife nicely suggested that I should finish these first! Sage advice but I missed out on a nice 65 GTO convertible! Is that an English Creme Retriever? We have two which is the reason we drive from Denver to Florida for the winter. Looking forward to the rest of your build!
Some progress, floors are in and I decided to raptor the underneath since I plan on driving it and wanted something durable. The front floor pans were a bear as none of the lines or creases lined up with the existing floor. Took some reshaping to get them it match. Firewall all welded up and final coat of filler going on. Progress is slow....slower than I thought. A lot of damn work and not a lot of time.
Aircraft stripper is probably the best chemical stripper you can get, but it is pretty nasty stuff. You definitely don't want it on your skin. Not a bad idea to use a mask as well. Brush on, let sit, scrape off. Depending on how many times the car has been painted, it may take more than one round of chemical stripping to get everything off.
Some progress, firewall cleaned up and primed, floors coated and will seam seal next, old quarters off and inner wells painted and qtr windows cleaned up and adjusted, new quarter skins 90% fitted - Taiwan product and boy were they way off. Took a lot of shaping but got them damn close.
Quarters all welded with a coat of upol filler before finishing. Old roof off and fitting new one. Pretty happy with the overall fit of the roof, not a ton of trimming to do but just getting started....
All of the heavy sheetmetal work complete. - new quarters and roof done and in epoxy. Lots
of massaging in the new panels but really not bad. Project should move pretty fast now (famous last words) goal is to have it painted and ready to assemble over Christmas.
Exciting milestone, finally got some color on the car. Firewall complete so I can mount to chassis and align everything. Will paint doors, hood, trunk and fenders off car, but paint body on chassis.
Lots of progress and getting really close to paint. We decided paint with the car all together and spend a little more time masking everything off. Don’t really want to risk scratching etc realigning everything. Really happy with the way everything fits. Final block with 800 and we are ready. Should be within the next few weeks. Wiring is coming along, using a kit from American Autowire - 3rd time using their stuff ad really like the quality. I made some brackets to reposition the fuse block for easier access and more clearance.
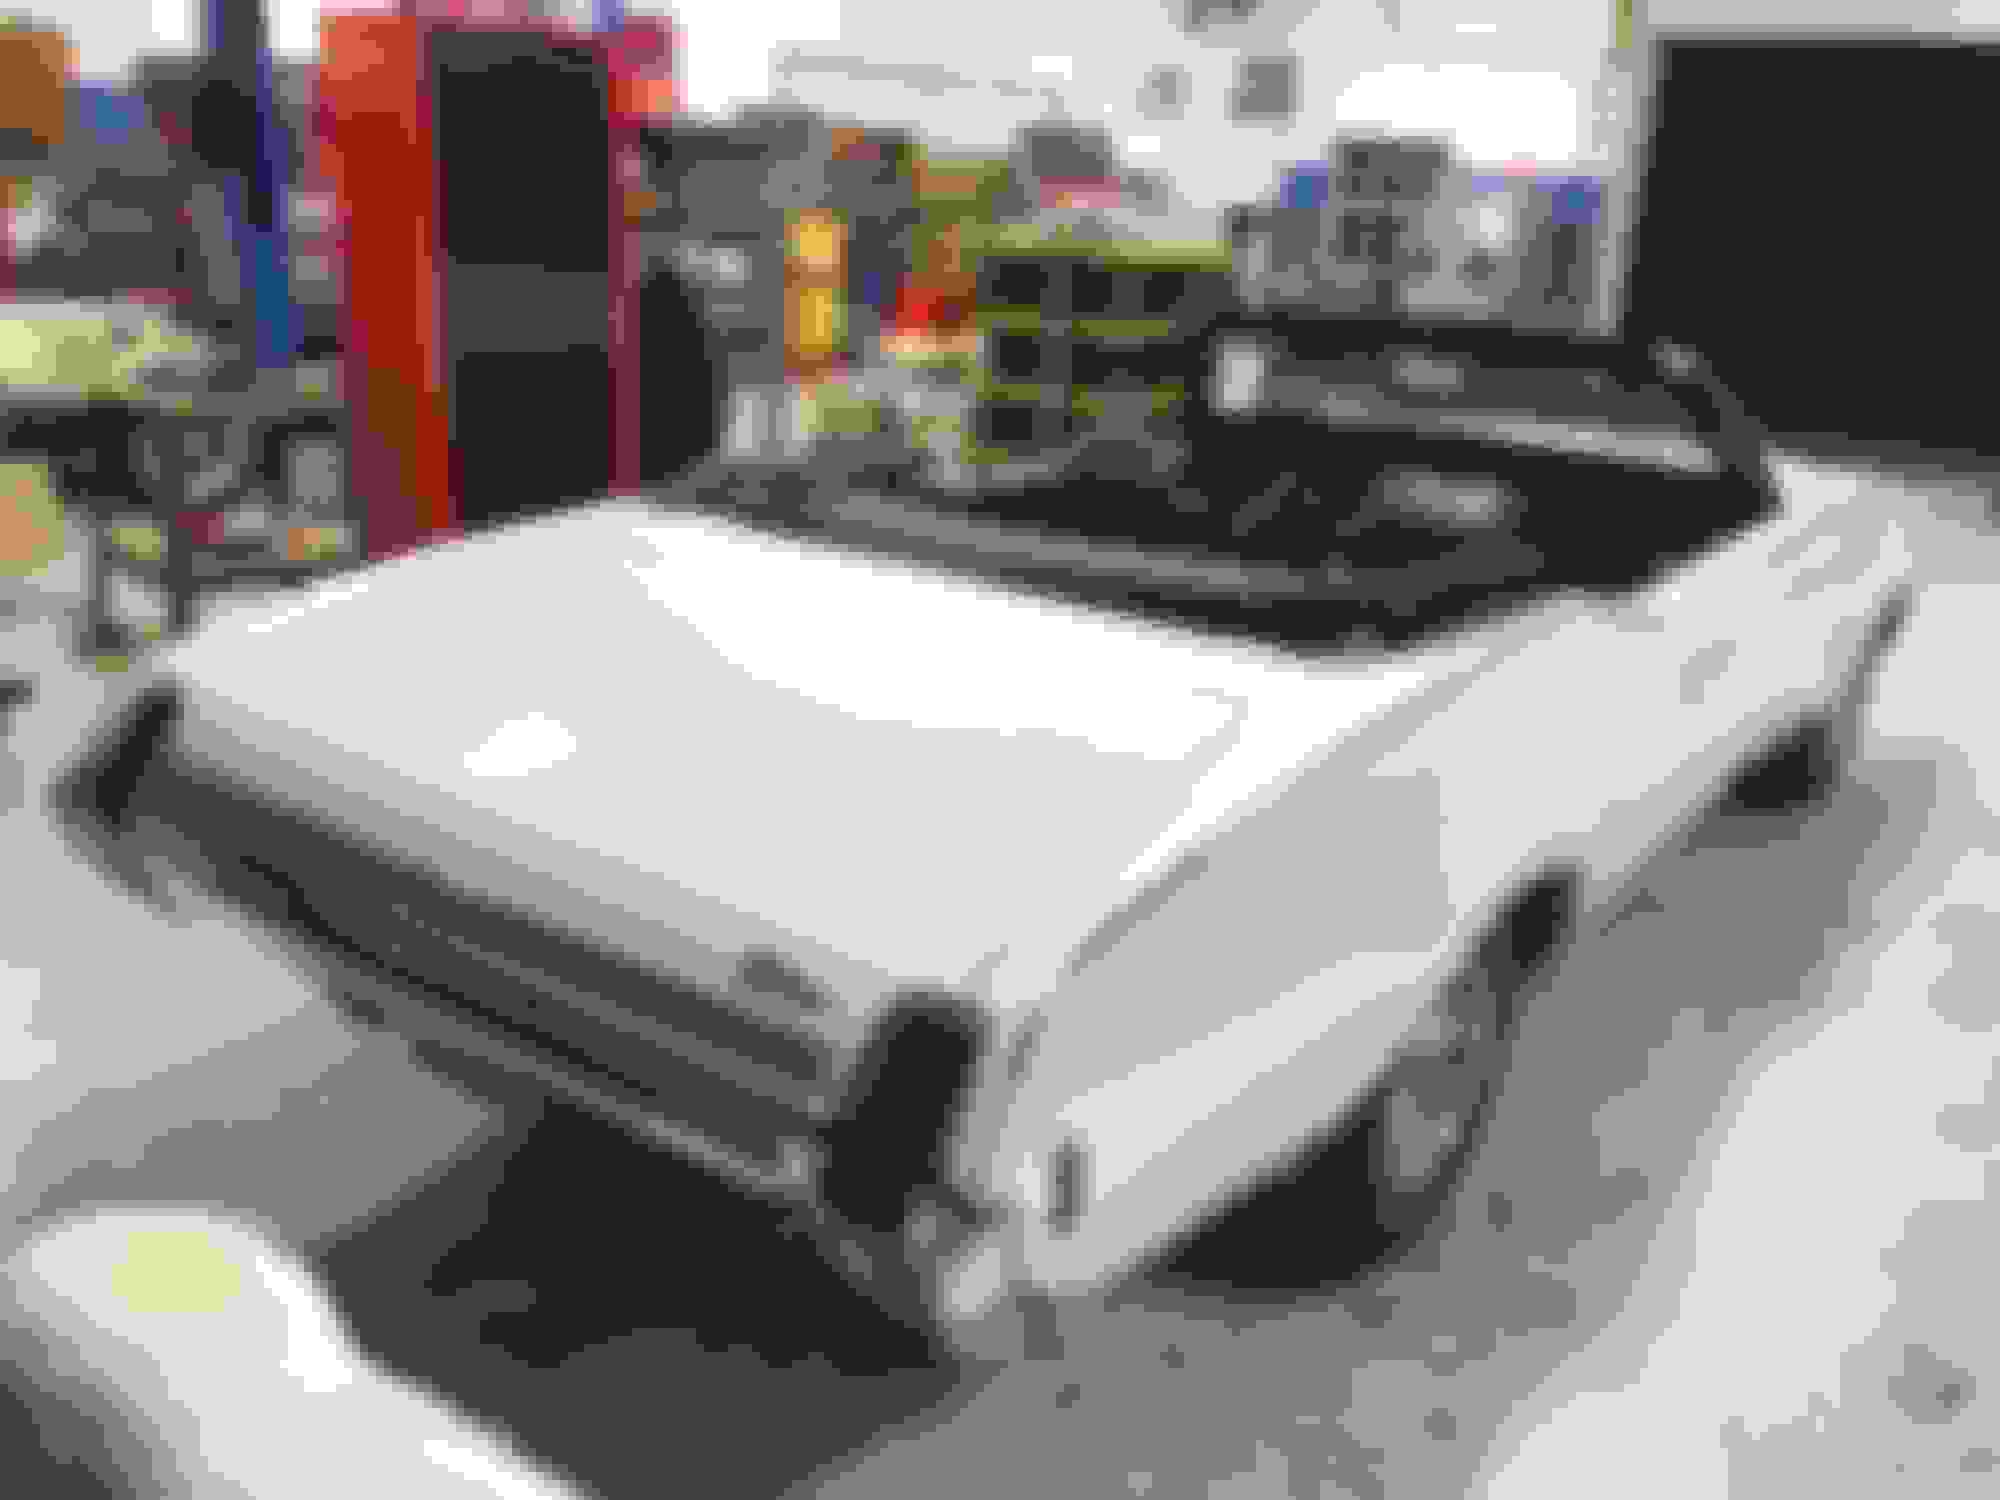
Finally got color on and pretty pleased with the results with the bouncy house! So dirt and orange peel as to be expected but it’ll all cut and buff out. Been over two years, but it was worth it. Fun part now - putting it all back together!
Cut and polished and am really happy with the results. Now it’s all in me to put it back together….been waiting two years to get to this point.
as an aside - the hood hinges in one picture are ring brothers and I would not recommend them for a 69 cutlass hood. The hood won’t stay up. Ring Brothers says yeah that hood is heavy and we are having problems with the 400 lb cylinders. I had a hard time getting them to be responsive but they told me they will make it right and get me 450 lb cylinders once they get them from their supplier. This is a new offering and apparently I’m not the only one with this problem.
as an aside - the hood hinges in one picture are ring brothers and I would not recommend them for a 69 cutlass hood. The hood won’t stay up. Ring Brothers says yeah that hood is heavy and we are having problems with the 400 lb cylinders. I had a hard time getting them to be responsive but they told me they will make it right and get me 450 lb cylinders once they get them from their supplier. This is a new offering and apparently I’m not the only one with this problem.
Be careful going to 450 lb cylinders. I have a set of Eddie Motorsport hinges on my vista cruiser. They came with 460 lb cylinders and nearly tore themselves apart while I was driving. The ring brothers hinges look to be the same basic construction. For a ful write-up of my problem, read post #2 and #7 in the following thread: https://classicoldsmobile.com/forums...r-hood-166811/
Here are some pics. My hinges came with 460 lb cylinders (times 2 = 920 lbs). When I ordered them, I got them for a stock flat hood for a 72 cutlass. After I discovered the problem, I bought 300 lbs (times 2 = 600 lbs) cylinders to replace them. The problem was that the bearings in the small links connecting the front and rear arms started to deform. The pics below show what happened after less than 1000 miles of driving. It would have destroyed the paint on the hood and fenders if I had not descovered the problem. With the 300 lb cylinders, the hood does not have a problem staying up at over 60 degress. Once the temps drop below 40, the hood does have trouble staying up, but it is worth it not to have to worry about the screws pulling out of my new links.
Original cylinders:
Here is what the dog bone ends are supposed to look like:
Here are the damaged ends on the dog bones:
As I said, they almost pulled apart.
Here are the links I made to replace the original dog bones:
They are made of male and female threaded hime joints (originally throttle linkage components). These came with an added benifit; changing the length of the link actually provides some further adjustability of the hood hieght when it is closed.
On a side note, Eddie motorsport refused to to anything to help correct the problem. I paid close to $700 for the hinges originally plus $200 for the new 300 lb cylinders and probably $30-$40 in hardware for the new links.
Last edited by Loaded68W34; December 4th, 2022 at 04:13 PM.
 August 29th, 2020, 04:58 AM