My 68 442 Convert Restoration
 October 25th, 2014, 10:31 AM
#1
Gary
Thread Starter
Join Date: Jul 2007
Location: Houston,Tx
Posts: 1,202
My 68 442 Convert Restoration
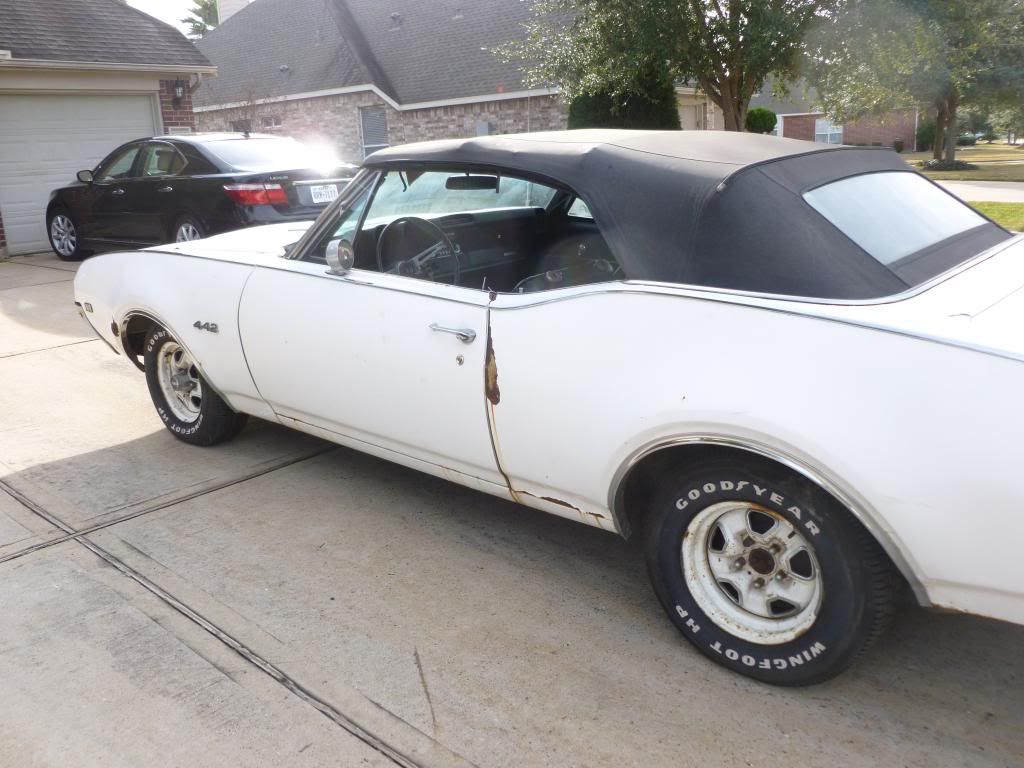
I have begun the restoration of my 68 442 convertible. Just wanted to share with you guys some of my progress. Got the car in January of this year and began working on it in March. My plan is to have this car completed by March of 2015.
Here is what the car looked like when I got it.
P1000251_zps9384d991.jpg
P1000253_zpsf8254825.jpg
P1000254_zpsffbdba25.jpg
P1000257_zps7c9f2dfb.jpg
P1000264_zps5a9b6d8e.jpg
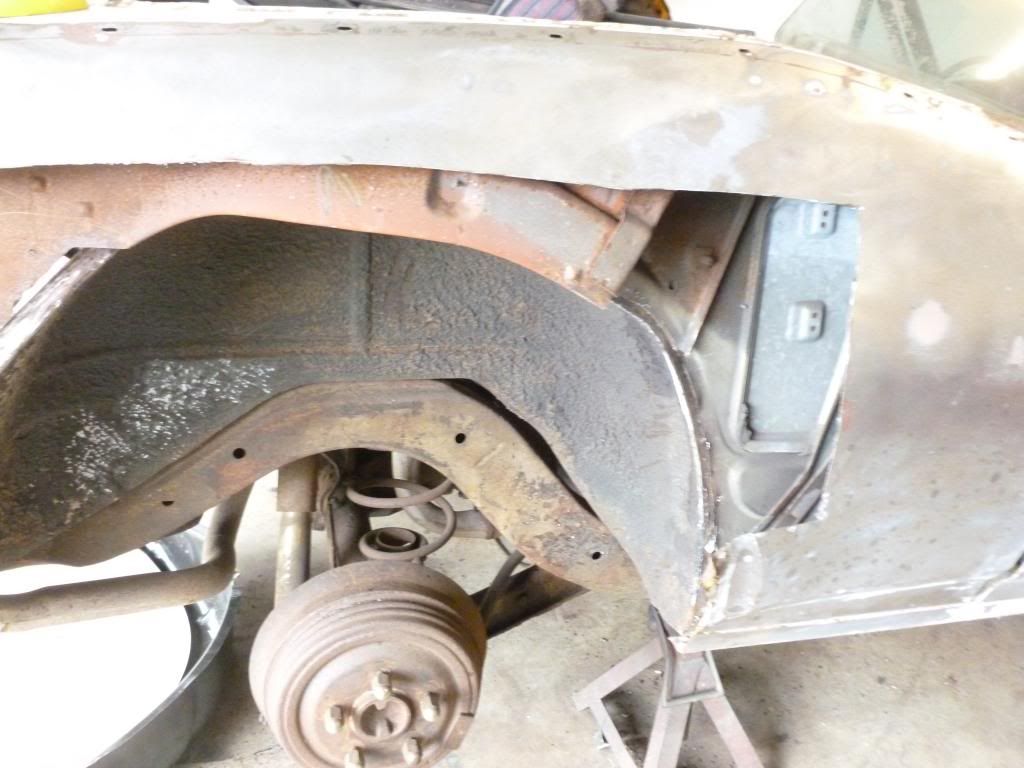
Ok here is what I have done so far. The worst thing to do on the outer wheel housing is to cut the whole thing off. Unless its completely rusted. I should have just cut off the bad portion and welded the replacement in. Had to use a outer for a hardtop which is ok but don't cut the entire outer off. I ended up messing up one new housing while trying to modify.
P1000268_zpsa842f981.jpg
P1000269_zpsdbafac2d.jpg
photo2_zpse78c663c.jpg
photo_zps0ce8ceb3.jpg
Sorry but I guess I have lost the pictures of the outer wheel housing. But here it shows where I put the quarter on. I did but weld it. Here is what the weld looks like inside the trunk.
P1010030_zpsd3275a30.jpg
P1010029_zps6cb62cde.jpg
P1010028_zpsef21e545.jpg
This is what the seats looked like. Pretty rusty
P1010036_zps0260f9ca.jpg
P1010037_zps6ca8c595.jpg
P1010038_zps2110a2b9.jpg
P1010039_zpscb5d0222.jpg
P1010040_zps488738c4.jpg
got plenty of more pictures. don't want to try to load all on this one post. Uploading the others now.
Here is what the car looked like when I got it.
P1000251_zps9384d991.jpg
P1000253_zpsf8254825.jpg
P1000254_zpsffbdba25.jpg

P1000257_zps7c9f2dfb.jpg
P1000264_zps5a9b6d8e.jpg
Ok here is what I have done so far. The worst thing to do on the outer wheel housing is to cut the whole thing off. Unless its completely rusted. I should have just cut off the bad portion and welded the replacement in. Had to use a outer for a hardtop which is ok but don't cut the entire outer off. I ended up messing up one new housing while trying to modify.

P1000268_zpsa842f981.jpg
P1000269_zpsdbafac2d.jpg
photo2_zpse78c663c.jpg
photo_zps0ce8ceb3.jpg
Sorry but I guess I have lost the pictures of the outer wheel housing. But here it shows where I put the quarter on. I did but weld it. Here is what the weld looks like inside the trunk.
P1010030_zpsd3275a30.jpg
P1010029_zps6cb62cde.jpg
P1010028_zpsef21e545.jpg
This is what the seats looked like. Pretty rusty
P1010036_zps0260f9ca.jpg
P1010037_zps6ca8c595.jpg
P1010038_zps2110a2b9.jpg
P1010039_zpscb5d0222.jpg
P1010040_zps488738c4.jpg
got plenty of more pictures. don't want to try to load all on this one post. Uploading the others now.
 October 25th, 2014, 11:05 AM
#2
Gary
Thread Starter
Join Date: Jul 2007
Location: Houston,Tx
Posts: 1,202
P1010041_zps4e594283.jpg
P1010042_zpsf9ae213f.jpg
this frame I had to fix the badly rusted part of the frame. Cut of the bad portion and welded a new piece in.
P1010043_zps6d23a56f.jpg
this is what they looked like after I sandblasted them.
P1010045_zpsf9a02eaa.jpg
P1010046_zps33d5a5a9.jpg
P1010047_zps5dcf28b6.jpg
Started painting them with Por15.
P1010049_zps001ac586.jpg
P1010050_zps6ba5e94d.jpg
P1010051_zps52087ab6.jpg
P1010053_zpsdbfac45e.jpg
P1010054_zps4cf6962b.jpg
P1010055_zps4366e541.jpg
So after the blasting and painting of the seat frames I too the seats to my upholstery man. Told him I wanted leather seats. So here is what they look like now. Thought he did a great job. Could not get the "diamond" looking material so I choose to go with same leather all over. But the pattern is correct.
P1010056_zps68e1c662.jpg
P1010057_zpsfed0240b.jpg
P1010058_zpsac6ccf8c.jpg
P1010059_zpsc45b9880.jpg
P1010060_zps5208d082.jpg
P1010061_zps045f469a.jpg
P1010062_zpsc3424746.jpg
P1010064_zps4ff1f567.jpg
Next week my plans is to pull the engine and then remove the body off the frame and take it to be powered coated. Not really sure what I am going to do about the engine just yet. I went and talked with the guy who rebuilt my last engine and he asked me how did the engine run. I told him it ran really good. His suggestion to me if it was running good, then he doesn't think I need a rebuild. I was surprised at that. But just might let him redo the heads. Now he did say he would rebuild it but it probably doesn't need it.
October 25th, 2014, 11:19 AM
#3
Gary
Thread Starter
Join Date: Jul 2007
Location: Houston,Tx
Posts: 1,202
P1010062_zpsc3424746.jpg
P1010064_zps4ff1f567.jpg
P1010065_zps747b8842.jpg
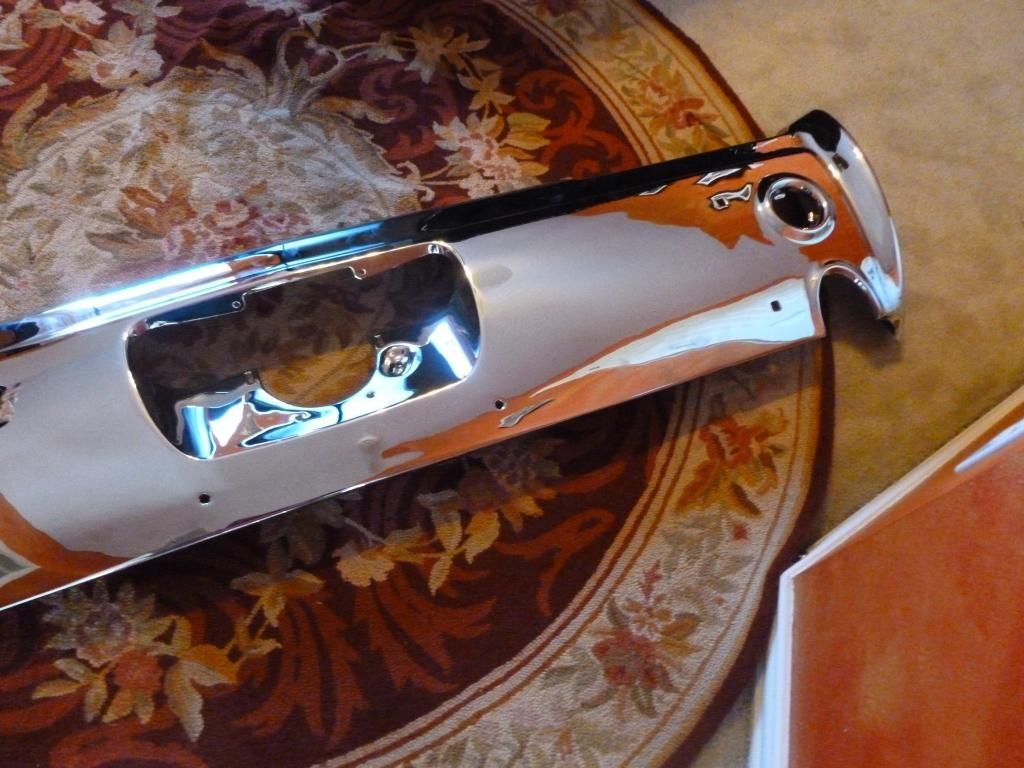
Here are my bumpers that was done by a shop here that does work for Jay Leno. The rear one was bent and they did a really good job fixing it. It also has holes for a trailer hitch which I choose not to have plugged up.
P1010067_zps66bd245f.jpg
P1010068_zps6da7fa93.jpg
P1010068_zps6da7fa93.jpg
P1010070_zps3a35a5f4.jpg
Decided I would purchase a body rotisserie. I was going to build one but decided just to purchase one.


P1010064_zps4ff1f567.jpg
P1010065_zps747b8842.jpg
Here are my bumpers that was done by a shop here that does work for Jay Leno. The rear one was bent and they did a really good job fixing it. It also has holes for a trailer hitch which I choose not to have plugged up.

P1010067_zps66bd245f.jpg
P1010068_zps6da7fa93.jpg
P1010068_zps6da7fa93.jpg
P1010070_zps3a35a5f4.jpg
Decided I would purchase a body rotisserie. I was going to build one but decided just to purchase one.


Last edited by Gary's 2 442-S; October 26th, 2014 at 04:34 AM.
October 25th, 2014, 11:24 AM
#4
Gary
Thread Starter
Join Date: Jul 2007
Location: Houston,Tx
Posts: 1,202
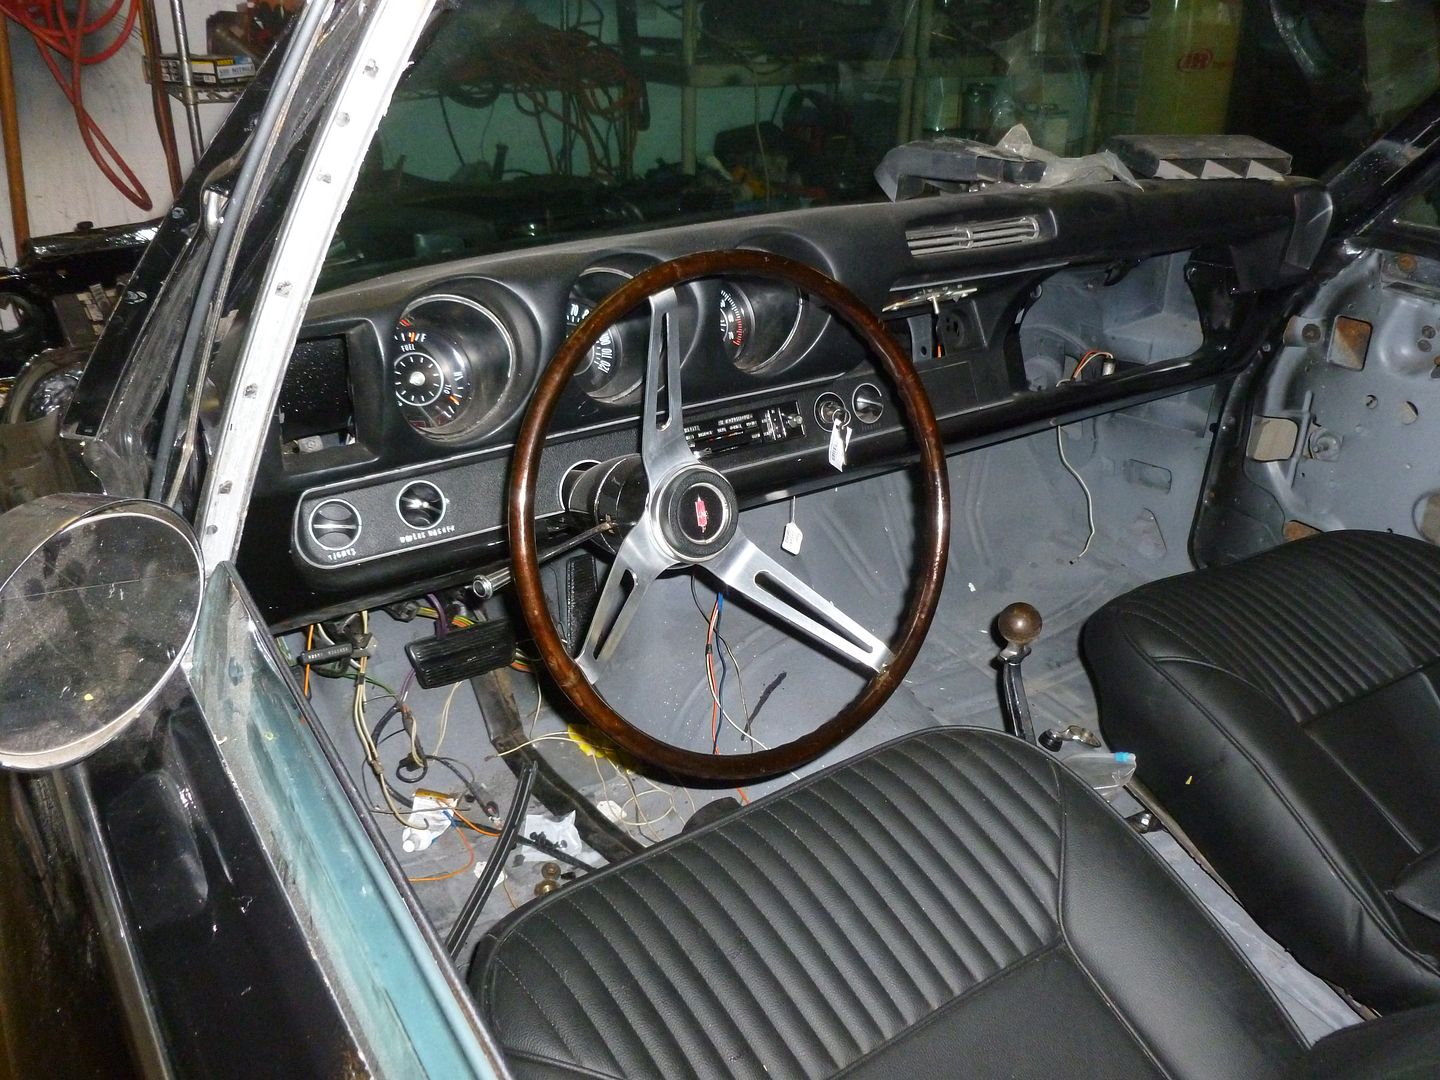
I also ordered the door panels from Legendary. It took the about 5 weeks to build them. They are now being shipped. I will post some pictures of them once I get them.
Last edited by Gary's 2 442-S; October 25th, 2014 at 02:41 PM.
October 25th, 2014, 01:16 PM
#5
Randy C.
Join Date: Feb 2009
Location: Albany, OR
Posts: 3,251
I am enjoying your pictures and look forward to watching your progress. Your restoration plan is much more aggressive than mine. I took 2 1/2 years. It seemed to take forever, getting parts ready. But every once in awhile, when several things were ready to install, it seemed like there was a big flurry of accomplishment. Then it would go back to getting more parts ready. You'll enjoy the end product, though...I know I do!
Randy C.
Randy C.
 October 25th, 2014, 02:45 PM
#8
Gary
Thread Starter
Join Date: Jul 2007
Location: Houston,Tx
Posts: 1,202
I am enjoying your pictures and look forward to watching your progress. Your restoration plan is much more aggressive than mine. I took 2 1/2 years. It seemed to take forever, getting parts ready. But every once in awhile, when several things were ready to install, it seemed like there was a big flurry of accomplishment. Then it would go back to getting more parts ready. You'll enjoy the end product, though...I know I do!
Randy C.
Randy C.
October 25th, 2014, 02:53 PM
#10
Gary
Thread Starter
Join Date: Jul 2007
Location: Houston,Tx
Posts: 1,202
I have stripped the remaining body shell. Looks good as far a damage/rust. I plan on taking the body off the frame next week or so. Good thing about this body is I don't have to replace the trunk or interior floors. Had to do both on my last restore. Yes I do have some $$ tied up into the seats. I could have gotten the covers from Legendary but I wanted leather seats.
 November 8th, 2014, 01:03 PM
#12
Great job Gary. I noticed you only cut the quarter panel a little above the wheel well. I'm planning to do the same.When replacing the whole panel members are saying some shrinking needs to be done. Did you have to do much modification to the quarter to get the proper fit? Looks real good
Dave 69 442 convert
Dave 69 442 convert
November 8th, 2014, 01:09 PM
#13
Gary
Thread Starter
Join Date: Jul 2007
Location: Houston,Tx
Posts: 1,202
Thanks Joe,
I don't have any recent ones, I have been getting the 72 ready for Autorama. But I will start back on it in a couple weeks. Next step is to brace the body and then put the body on the rotisserie. Plan on taking the frame to powered coating.
I don't have any recent ones, I have been getting the 72 ready for Autorama. But I will start back on it in a couple weeks. Next step is to brace the body and then put the body on the rotisserie. Plan on taking the frame to powered coating.
November 8th, 2014, 01:21 PM
#14
Gary
Thread Starter
Join Date: Jul 2007
Location: Houston,Tx
Posts: 1,202
Great job Gary. I noticed you only cut the quarter panel a little above the wheel well. I'm planning to do the same.When replacing the whole panel members are saying some shrinking needs to be done. Did you have to do much modification to the quarter to get the proper fit? Looks real good
Dave 69 442 convert
Dave 69 442 convert
Actually I ended up cutting it higher probably a couple inches below where the holes are for pinch well moldings. I for some reason could not find my pictures of how far up I cut it. But if you look at the picture of the inside the trunk area, you can get an idea about how far up I went. All the welds were butt welds. As you know they don't make a quarter for the 68/69 converts. You have to use one for a hardtop. Also unless your outer wheel well is completely rusted don't do as I did and cut the whole thing off. You will regret it. 69442C has a really good thread on the quarter/wheel housing replacement. https://classicoldsmobile.com/forums...n-project.html
November 8th, 2014, 01:39 PM
#15
Gary
Thread Starter
Join Date: Jul 2007
Location: Houston,Tx
Posts: 1,202
Dave thanks,
Actually I ended up cutting it higher probably a couple inches below where the holes are for pinch well moldings. I for some reason could not find my pictures of how far up I cut it. But if you look at the picture of the inside the trunk area, you can get an idea about how far up I went. All the welds were butt welds. As you know they don't make a quarter for the 68/69 converts. You have to use one for a hardtop. Also unless your outer wheel well is completely rusted don't do as I did and cut the whole thing off. You will regret it. 69442C has a really good thread on the quarter/wheel housing replacement. https://classicoldsmobile.com/forums...n-project.html
Actually I ended up cutting it higher probably a couple inches below where the holes are for pinch well moldings. I for some reason could not find my pictures of how far up I cut it. But if you look at the picture of the inside the trunk area, you can get an idea about how far up I went. All the welds were butt welds. As you know they don't make a quarter for the 68/69 converts. You have to use one for a hardtop. Also unless your outer wheel well is completely rusted don't do as I did and cut the whole thing off. You will regret it. 69442C has a really good thread on the quarter/wheel housing replacement. https://classicoldsmobile.com/forums...n-project.html
P1010031_zpse51ad924.jpg
November 9th, 2014, 06:47 PM
#16
Registered User
Join Date: Jan 2008
Location: South River, New Jersey
Posts: 3,515
Gh nice work so far, I am just in tge process of hanging the quarter, I already spliced the outer wheel house, man you must have been drilling spot welds for days getting that ***** off lol... mine was in really really good shape I cut mine on the curve asiheard curves are harder to warp.
Pitfield
the quarter from goodmark year onefits pretty darn good, iam doing my quarters now, just saying,
G also lovetye bumpers man.... shiney....
Following along....
Pitfield
the quarter from goodmark year onefits pretty darn good, iam doing my quarters now, just saying,
G also lovetye bumpers man.... shiney....
Following along....
November 9th, 2014, 09:43 PM
#17
Gary
Thread Starter
Join Date: Jul 2007
Location: Houston,Tx
Posts: 1,202
Gh nice work so far, I am just in tge process of hanging the quarter, I already spliced the outer wheel house, man you must have been drilling spot welds for days getting that ***** off lol... mine was in really really good shape I cut mine on the curve asiheard curves are harder to warp.
Pitfield
the quarter from goodmark year onefits pretty darn good, iam doing my quarters now, just saying,
G also lovetye bumpers man.... shiney....
Following along....
Pitfield
the quarter from goodmark year onefits pretty darn good, iam doing my quarters now, just saying,
G also lovetye bumpers man.... shiney....
Following along....
November 10th, 2014, 01:24 AM
#18
Randy C.
Join Date: Feb 2009
Location: Albany, OR
Posts: 3,251
I had to replace the driver side quarter on my '68 - an accident my wayward sister had several years ago made a mess of that area. The body shop that did the work cut out most of the quarter and used a repro quarter for a hardtop cut to fit. That happened 7 years ago and it still looks great to this day. That effort got rid of bondo that was nearly 1/2" thick in spots.
Randy C.
Randy C.
November 10th, 2014, 05:13 AM
#19
Registered User
Join Date: Jan 2008
Location: South River, New Jersey
Posts: 3,515
I hear you.. I have the repo quarters , when I clamped the new over the old the marker light matched exact, so I removed all the way back and to the front inner brace by the door jamb, still considering welding it into the jamb just seeing how the gaps will be.
And I reade and reread brians 69, thread ask myself all the time what would. Brian do lol. Anyway I f
Regress love the progress.
One question gary did you use gas or flux wire ? Was looking at the smoke patterns I didnt get that ?
And I reade and reread brians 69, thread ask myself all the time what would. Brian do lol. Anyway I f
Regress love the progress.
One question gary did you use gas or flux wire ? Was looking at the smoke patterns I didnt get that ?
November 10th, 2014, 08:13 AM
#20
Gary
Thread Starter
Join Date: Jul 2007
Location: Houston,Tx
Posts: 1,202
I hear you.. I have the repo quarters , when I clamped the new over the old the marker light matched exact, so I removed all the way back and to the front inner brace by the door jamb, still considering welding it into the jamb just seeing how the gaps will be.
And I reade and reread brians 69, thread ask myself all the time what would. Brian do lol. Anyway I f
Regress love the progress.
One question gary did you use gas or flux wire ? Was looking at the smoke patterns I didnt get that ?
And I reade and reread brians 69, thread ask myself all the time what would. Brian do lol. Anyway I f
Regress love the progress.
One question gary did you use gas or flux wire ? Was looking at the smoke patterns I didnt get that ?
I used gas. I think the smoke pattern is because I used a lot of tac welds. I did not want it to warp. Yes Brians thread is a really good source on how to do it. I like what was done on Randy's 68 as well.
November 10th, 2014, 10:07 AM
#21
Registered User
Join Date: Jan 2008
Location: South River, New Jersey
Posts: 3,515
Thanks me too, was wondering if I was doing something wrong lol.... I am new at mig, last time I replaced metal was with acetylene LOL... and yes we rubbed two sticks together to light it..LOL...
September 12th, 2016, 10:21 AM
#22
Gary
Thread Starter
Join Date: Jul 2007
Location: Houston,Tx
Posts: 1,202
I have not posted anything lately, I had a severe injury to my thumb that required reconstructive surgery last year and pretty much kept me from doing much to the car. But now recovered from the injury I began to work on the car once again. Here is some of my progress.
P1010144_zpsfjnzgjgo.jpg
P1010145_zpslkzeovst.jpg
After I had the frame sand blasted. They use walnut shell.
P1010147_zpssqfpthit.jpg
P1010149_zpsbxnyf0g2.jpg
P1010151_zpsupccmdeo.jpg
I primed it with epoxy primer see below
P1010152_zpskhcrmbre.jpg
Began to paint it with Eastwood extreme chassis black
P1010153_zpswkn7jvo1.jpg
P1010155_zpsim8iiqql.jpg
P1010156_zpswpbkwxqu.jpg
I had the rotors turned and decided to restore them myself. I believe these to be the original ones.
P1010166_zpsq40wbwqq.jpg
P1010167_zps9exmybzd.jpg
more pictures to come.
September 12th, 2016, 10:34 AM
#23
Gary
Thread Starter
Join Date: Jul 2007
Location: Houston,Tx
Posts: 1,202

P1010187_zpszhtcgnfz.jpg
P1010188_zpsxxcwad8b.jpg
P1010191_zpspxarmbdv.jpg
P1010192_zpstzweackg.jpg
P1010193_zpsq4o6b3ru.jpg
I tried putting some of the factory markings back on the frame. Still in the process but here are a couple.
P1010190_zpsazwgwfr4.jpg
P1010182_zpsx7vgzxl1.jpg
P1010185_zps5eh43deq.jpg
September 12th, 2016, 10:53 AM
#24
Gary
Thread Starter
Join Date: Jul 2007
Location: Houston,Tx
Posts: 1,202
Before and after of the front brakes.
P1010132_zps7gmh7pih.jpg
P1010183_zpsncjbzc7j.jpgP1010179_zpsxhz67dis.jpg
P1010178_zps6iynmr6u.jpg
P1010186_zpsfe6ekocx.jpg
P1010191_zpspxarmbdv.jpg
P1010193_zpsq4o6b3ru.jpg
P1010132_zps7gmh7pih.jpg
P1010183_zpsncjbzc7j.jpgP1010179_zpsxhz67dis.jpg
P1010178_zps6iynmr6u.jpg
P1010186_zpsfe6ekocx.jpg
P1010191_zpspxarmbdv.jpg
P1010193_zpsq4o6b3ru.jpg
September 12th, 2016, 10:57 AM
#25
Gary
Thread Starter
Join Date: Jul 2007
Location: Houston,Tx
Posts: 1,202
September 12th, 2016, 11:10 AM
#26
Gary
Thread Starter
Join Date: Jul 2007
Location: Houston,Tx
Posts: 1,202
This is what the quarter panel looks like after I finished installing it.
P1010197_zpsu8sfyaur.jpg
P1010198_zpst7nvtzqe.jpg
P1010117_zpsyjknepzi.jpg
P1010197_zpsu8sfyaur.jpg
P1010198_zpst7nvtzqe.jpg
P1010117_zpsyjknepzi.jpg
September 12th, 2016, 11:15 AM
#27
Registered User
Join Date: Mar 2009
Location: Ohio
Posts: 845
Very nice work!!! looks great! Those rotors are probably off a '70 since they have the groove in the middle of them( I might be mistaken but I think '70 was the only year that had the grooves). Your calipers are the '69 up single piston type. The original '68 rotors were 2 pc & the '67-'68 calipers were the huge 4 piston type like the old vettes used. A previous owner probably added the newer disc brake setup,it's an easy upgrade. I added the newer type like yours on my own '68 as they're far easier to get parts for & MUCH cheaper! Your valve covers are on backwards by the way, the notches go to the back for clearance for the power brake booster & a/c box. That "404" on your rear axle should also be stamped on the side of the left rear frame rail next to the frame part# & build date codes. It's your build sequence # for the chassis dept of the assembly plant. Mine had 39 still visible on the rear & it's also stamped on the frame rail. Mine is a Lansing built car.
September 12th, 2016, 11:25 AM
#28
Gary
Thread Starter
Join Date: Jul 2007
Location: Houston,Tx
Posts: 1,202
Underneath the body. The undercoating was very challenging to remove. Took quite a while to do so.
P1010200_zps5o53risa.jpg
P1010201_zpseppxwnaj.jpg
P1010202_zpsol2dcykm.jpg
P1010203_zpskejkplaq.jpg
P1010205_zps7xl7xrwr.jpg
P1010200_zps5o53risa.jpg
P1010201_zpseppxwnaj.jpg
P1010202_zpsol2dcykm.jpg
P1010203_zpskejkplaq.jpg
P1010205_zps7xl7xrwr.jpg
September 12th, 2016, 11:48 AM
#31
Gary
Thread Starter
Join Date: Jul 2007
Location: Houston,Tx
Posts: 1,202
Very nice work!!! looks great! Those rotors are probably off a '70 since they have the groove in the middle of them( I might be mistaken but I think '70 was the only year that had the grooves). Your calipers are the '69 up single piston type. The original '68 rotors were 2 pc & the '67-'68 calipers were the huge 4 piston type like the old vettes used. A previous owner probably added the newer disc brake setup,it's an easy upgrade. I added the newer type like yours on my own '68 as they're far easier to get parts for & MUCH cheaper! Your valve covers are on backwards by the way, the notches go to the back for clearance for the power brake booster & a/c box. That "404" on your rear axle should also be stamped on the side of the left rear frame rail next to the frame part# & build date codes. It's your build sequence # for the chassis dept of the assembly plant. Mine had 39 still visible on the rear & it's also stamped on the frame rail. Mine is a Lansing built car.
September 12th, 2016, 12:28 PM
#32
Gary
Thread Starter
Join Date: Jul 2007
Location: Houston,Tx
Posts: 1,202
Seat belts were in awful shape. I sent them off to Snake Oyl to get an estimation on cost to restore. Needless to say their price was much more than I was willing to pay. So I decided to do them myself. I removed the hardware and washed them in the washing machine and put new hardware and resewed the belts on my wife's sewing machine.
P1010032_zps591ad2ae.jpg
P1010033_zps6dcb3d91.jpg
P1010033_zpsc272f356.jpg
P1010206_zpsqu0pq5rn.jpg
P1010207_zpshdx1ifsl.jpg
P1010208_zpsyd81late.jpg
P1010032_zps591ad2ae.jpg
P1010033_zps6dcb3d91.jpg
P1010033_zpsc272f356.jpg
P1010206_zpsqu0pq5rn.jpg
P1010207_zpshdx1ifsl.jpg
P1010208_zpsyd81late.jpg
 January 24th, 2017, 02:03 PM
#37
Gary
Thread Starter
Join Date: Jul 2007
Location: Houston,Tx
Posts: 1,202
I have painted the doors and the body. I will be putting the body back on the frame this weekend with the help of my nephews,son in laws and grandson.
Here is a picture of one of the doors. The color is Black Barolo when in the shade looks black but with sunlight on it, it will look cherry/maroon. I will post more pictures when I get the body back on it. It is covered up in plastic since I dont want the paint to get scratched while we are reinstalling it to the frame. I have not painted the fenders or hood. There is work needed on the drivers side lower fender.
P1010288_zpszbstn3db.jpg
P1010290_zps1mxkz74s.jpg
P1010291_zpsxi3ub8va.jpg

Last edited by Gary's 2 442-S; December 28th, 2017 at 03:37 PM.
December 28th, 2017, 03:09 PM
#38
Gary
Thread Starter
Join Date: Jul 2007
Location: Houston,Tx
Posts: 1,202
Here is further progress of my restoration. I am going to have to do some touch up on the paint because when putting the convertible top back on,my grandson dropped it and I got a couple of scratches on it that is going to have to be repainted. I am going to send the carburetor out for a rebuild. I am also going to send the radio out to have digital electronics installed in it. I also plan on adding the OAI system from THE PARTS PLACE. I know some have said that OAI system is not all that great but I am going to try and see how it works out. Also the convertible top is going to be replaced. I also have to get the right side tail pipe modified because it just doesn't fit correctly. Hope to finish this car by March. Its nice and cool here so I can work on it easier. I also have bought the red front inner fender wells.My wife has been keeping me busy with all her "honey do" stuff and lots of traveling. Otherwise I would be completed by now.
The top has a tear in it. I tried to repair it but I am certainly not happy with it. So it must be replaced
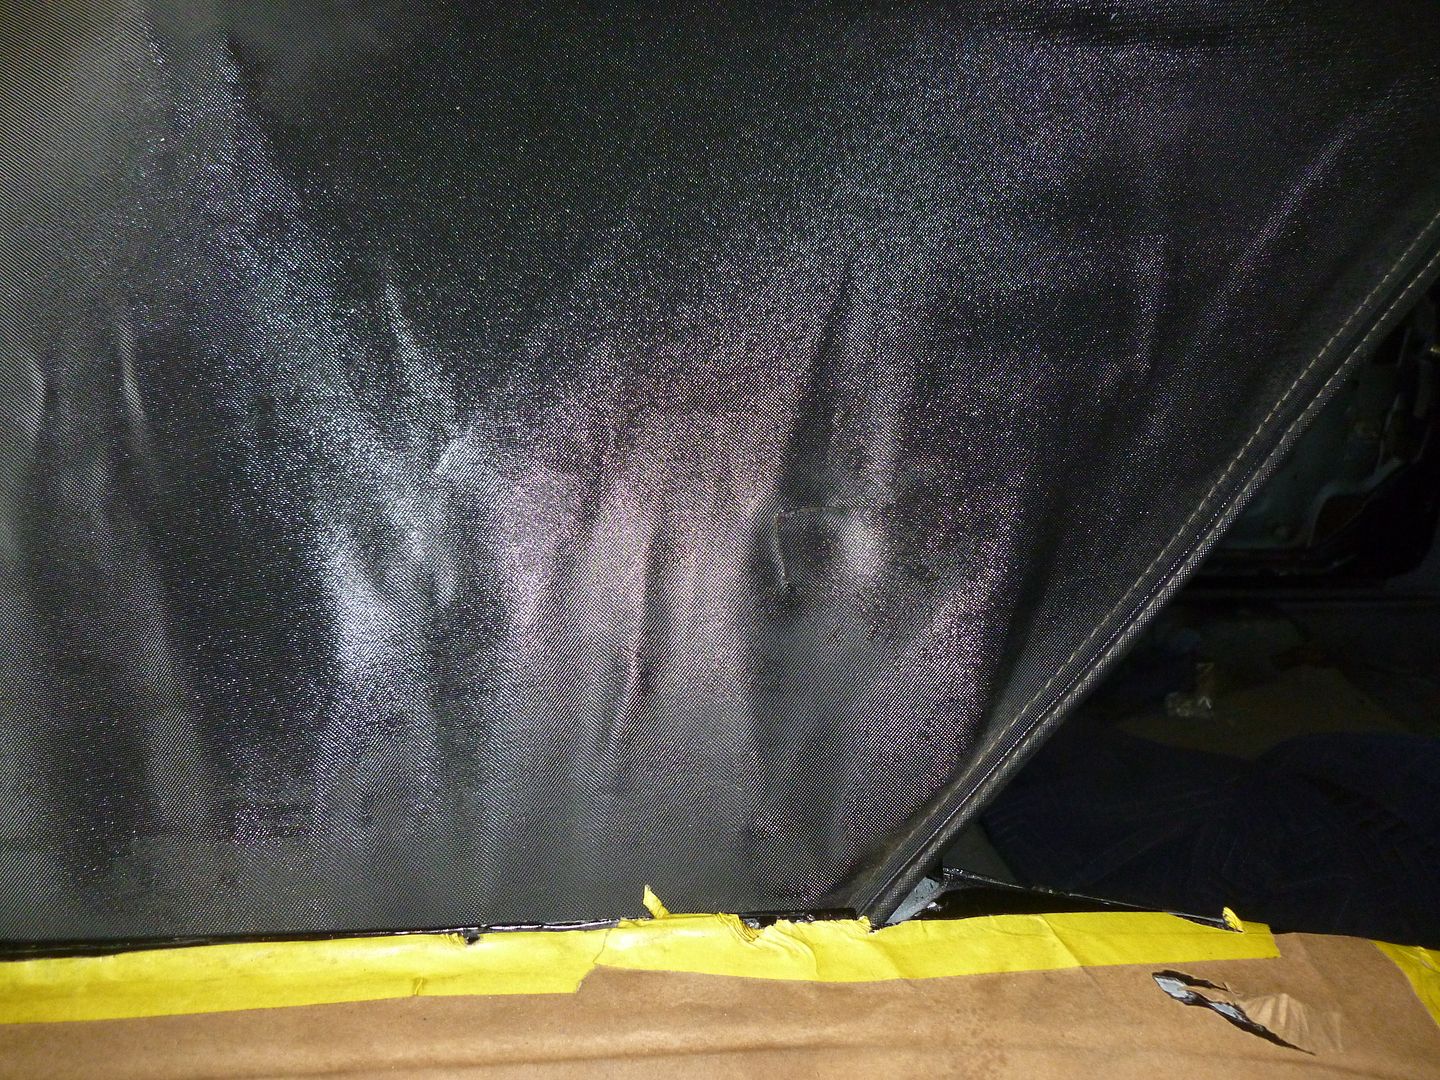

The top has a tear in it. I tried to repair it but I am certainly not happy with it. So it must be replaced

Last edited by Gary's 2 442-S; December 30th, 2017 at 06:38 PM.


 December 28th, 2017, 03:20 PM
#40
Gary
Thread Starter
Join Date: Jul 2007
Location: Houston,Tx
Posts: 1,202


There is a lot of dust on the car. Also I have lots of tape residue on the car because I used masking paper on it to protect it. I should have just used plastic sheeting to cover it.
Last edited by Gary's 2 442-S; December 28th, 2017 at 04:30 PM.


