When you click on links to various merchants on this site and make a purchase, this can result in this site earning a commission. Affiliate programs and affiliations include, but are not limited to, the eBay Partner Network.
I've been trying to search and find anything on this subject, but I may be using the wrong search terms. 1967 Toronado - I have a MASSIVE oil leak at the front of my engine, behind the front engine mounting support plate. I assume it is the front seal on the crank, but because I can see a bit of gasket missing from the leading edge of the oil pan, it could possibly be related to that. In any case, I can't see anything certain with the motor mount attached the way it is. Is it possible to support the front weight of the engine with a hoist and remove the front motor mount to service the main seal and/or the front seal of the oil pan? I'm trying to avoid removing the engine completely due to space in my garage and the full onset of winter in Ohio... Maybe it's best to pull the whole thing, but it would be quite a feat. Oh, and how much is "massive"? About a half cup of oil when I pull in and stop. It's a drip while the engine is running, but a stream when it shuts off. Thanks for any advice or suggestions.
Last edited by BSiegPaint; November 1st, 2023 at 05:10 PM.
I have a MASSIVE oil leak at the front of my engine, behind the front engine mounting support plate. I assume it is the front seal on the crank, but because I can see a bit of gasket missing from the leading edge of the oil pan, it could possibly be related to that.
If you can visually see gasket material missing from the leading edge of the oil pan, I'm not clear why you're assuming it's the front crank seal? I think I'd prefer to identify the source of the massive leak before I begin asking about removing the engine. I don't know but I'm not all-in on removing an engine unless there's a solid reason to do so. Grab some fluorescent dye at the parts store & a black light pen. Wipe down the ENTIRE area very clean, add the dye, go for a short ride, come back and look for the massive leak. It should show up quite well. Pull the car into the garage so there's no ambient light source interfering with the black light & dye.
Last edited by Vintage Chief; November 1st, 2023 at 05:26 PM.
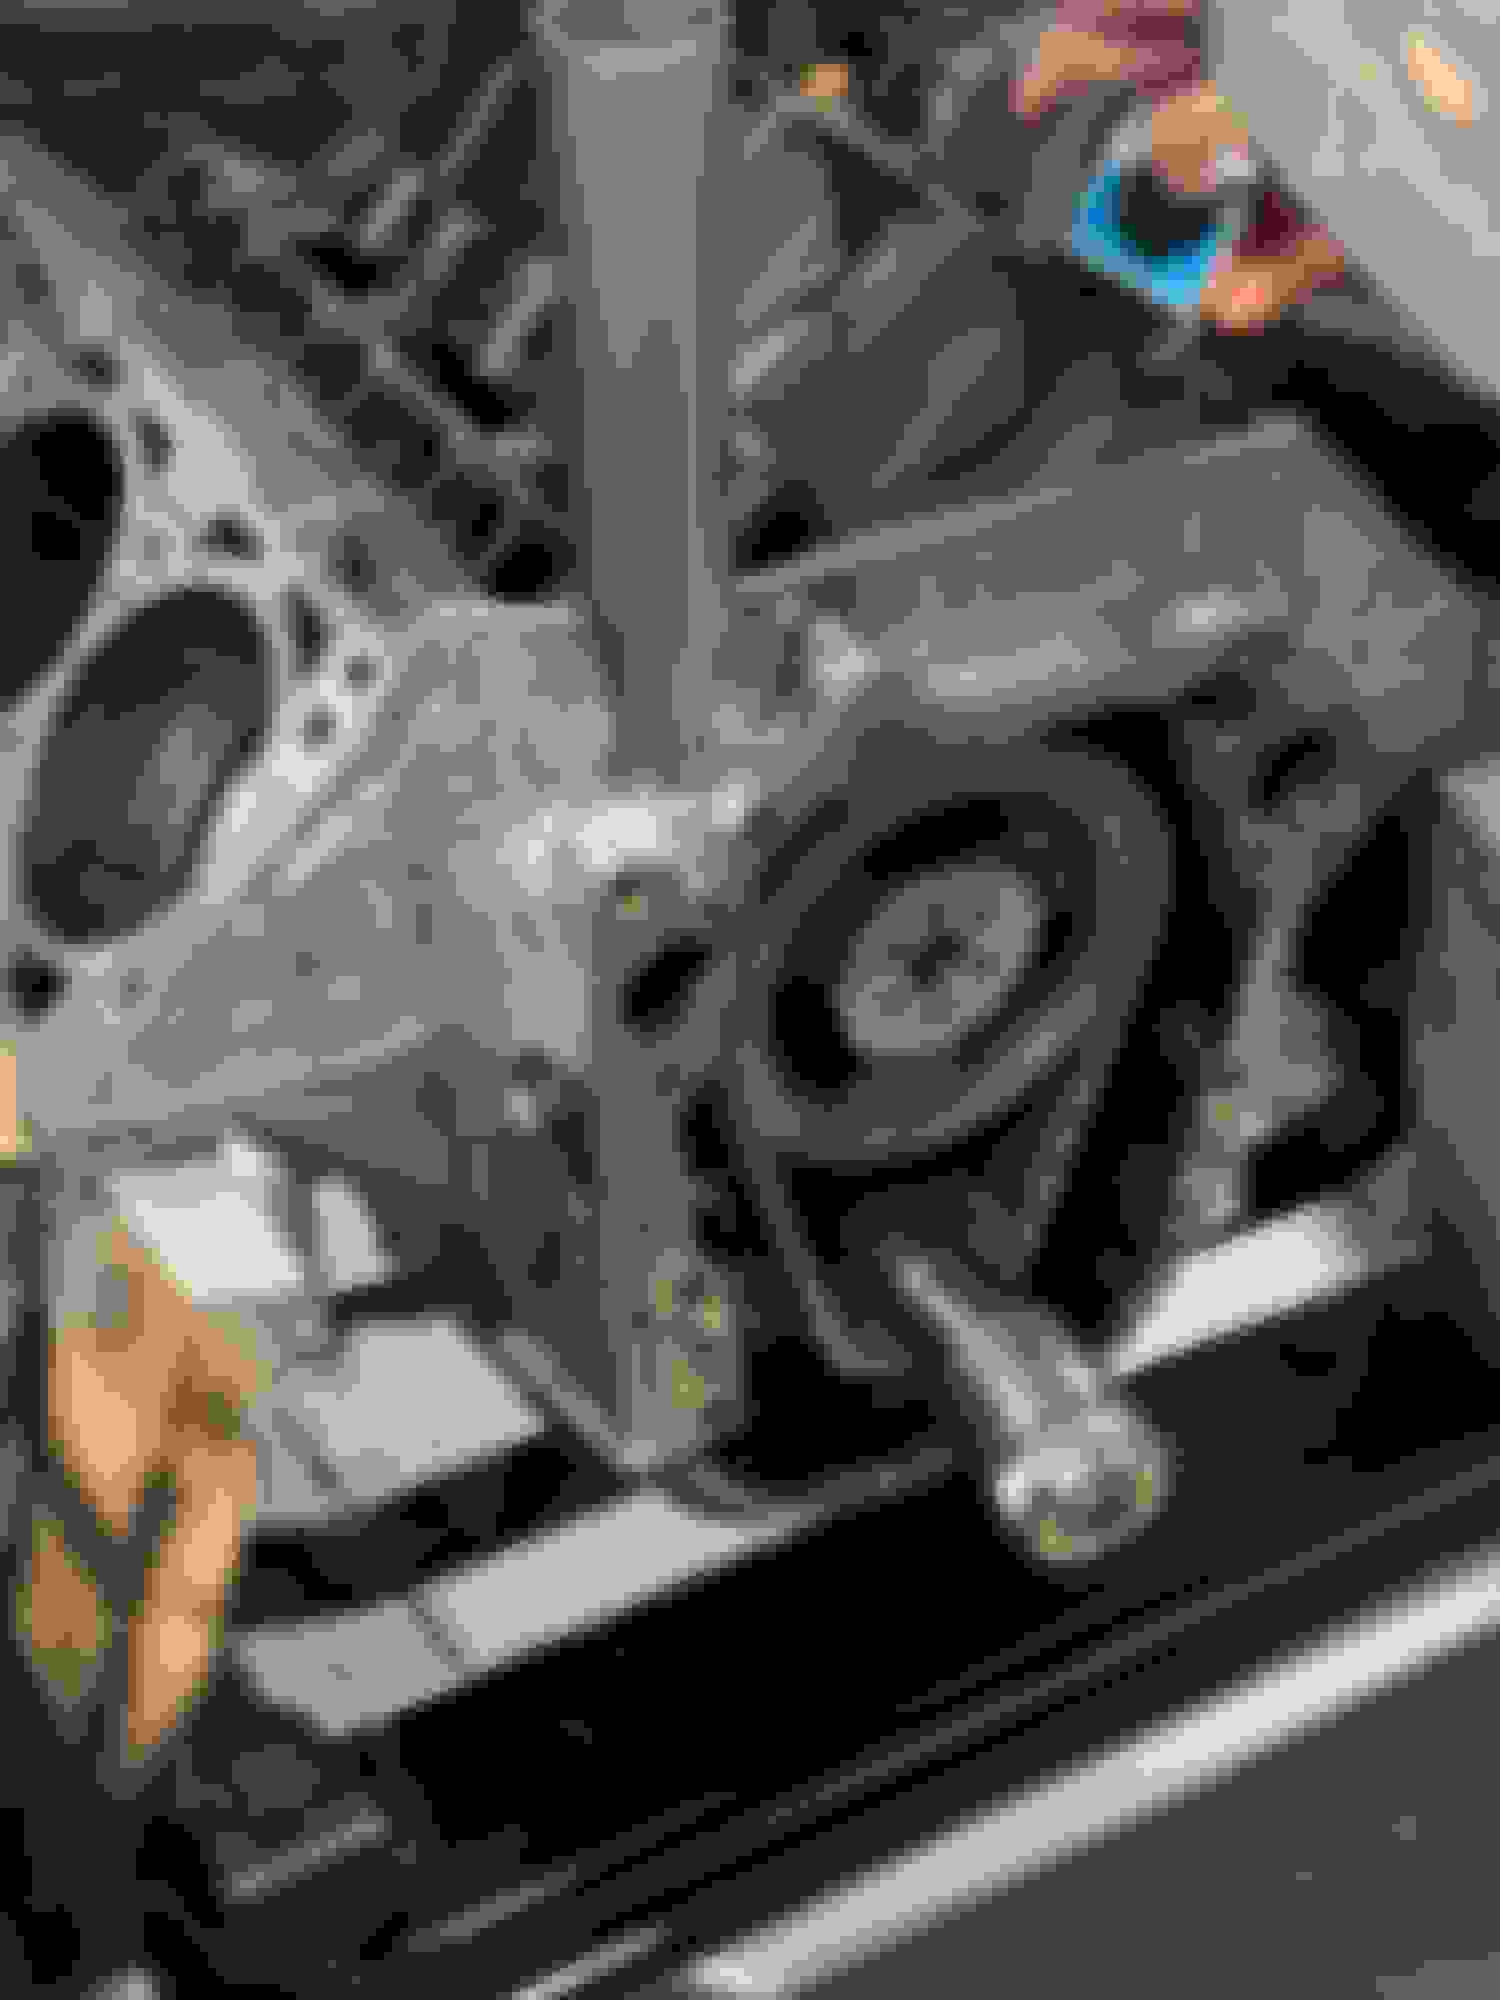
Thanks, Norm - my reasoning behind thinking it's the main seal is because there is oil evenly left to right across the crossmember underneath, not just the side where I can see a missing piece of gasket. I can get the dye and give it a try for sure. If it is inconclusive, can that front mount be removed in a safe manner? I'm going to try and get a couple pictures and see if those might help in some way.
Ok, I may have just found the issue by grabbing pictures where I couldn�t see before. Here is a pic looking up at the back side of the front mount and the front of the oil pan. That rubber seal couldn�t be in the correct position, and it looks like it�s missing a chunk.
Here is the top view where I noticed the missing cork gasket at the front of the pan
Bob - Understand about engine oil being dispersed evenly across the cross member; yet, how did that oil get there - while driving or simply sitting in one location with the engine running. If while driving the oil could have come from either location? Do this instead, after adding the dye, just run the engine for 5 to 10 minutes then visualize with the black light pen - instead of driving, returning and looking for the source of the leak. The dye does not lie. The source of the leak is going to show up very clearly. Save a HUGE headache and eliminates assumptions/guessing.
I'd have to look at a '67 CSM to answer the front motor mount question. Do you have the '67 CSM - it should list the procedure. I don't own a '67 Toronado CSM.
I'll do that. As I have backed the car into the driveway several times and let it sit running without a single drip, I'm pretty confident in saying the leak happens when the car is freshly turned off. When I pull into the garage and shut down, here comes the leak. I have the CSM - for items like this the first step is pull the motor. That's why I'm asking if anyone has successfully supported the front of the motor while changing things like the timing chain or cover gasket, etc. Since I'm looking at replacing the oil pan gasket as part of this leak, I think I may only have the option of removing it entirely.
A rear main seal would leak worse with the engine running. Road air combined with engine rotation and the fan can blow oil in many directions. It may need to be cleaned up and rechecked.
I agree with identifying the leak before removing anything.
Honestly, you're most likely asking the wrong guy regarding changing an oil pan gasket since I've changed out two oil pan gaskets w/ the engine remaining in the vehicle by following the CSM. I know of MANY who believe I'm crazy; and, instead suggest I just pull the entire engine (trans included). Hey, I think you need only something like 4" lift to remove the oil pan? Can't recall exactly. I have an engine lift and it makes short order of lifting the front of the engine 4". I didn't have any issues laying on my back removing the old gasket or installing a new gasket. I'm a very limber person so YMMV.
You're the kind of guy I want to hear from lol. If I can just hoist that motor up a few inches, drop the pan, remove the front mount, do a gasket replacement and get it back in place without pulling it off the trans, I'm all for it. I've never tried a front wheel drive motor, though. I will get the dye for the oil tomorrow and try to clean things off the best I can underneath. I may have to wait a couple days to get back under and clean things up more - it's freezing outside. Thanks for setting me on the right path forward.
Lots of cardboard under the oil pan area &/or a large commercial size flat baking pan (automotive drip pan) with as many old rags you can find. Engine cleaner (the foam type works really, really well) or oven cleaner (Walmart brand for ~$3/can), and a wire brush work well to remove the gunk/dirt/grime. You can pick up a roll of automotive red rags at parts store - I buy them in bulk at the big box stores (Home Depot, Lowe's etc.) in the caulk/paint section.
It looks to me like someone changed the timing chain on that engine previously and did a half-fast job of getting the front cover back on. Yes, have to support the engine to remove the front mount to access the front cover.
You can remove the drive axle, but you still have the issues of limited access to pan and bolts with the transmission and final drive being right next to the engine
Wish it wasn't so, but step 1 in every 1966-85 CSM:
SO TRUE. It's a bit surprising, actually. It seems like there would be various ways things could be accomplished, but I guess in the 60's the shops all had hoists, and really it's not THAT big of a deal to take the whole thing out. More scary than anything, if you haven't done it before, and you just need the room to do it. I'm struggling with "can I get the front mount and timing cover off/on and solve the leak at the bottom of the timing cover" - all the while thinking to myself that if I get it back together and it still leaks somewhere, I'll have to pull it all out anyway. Never time to do it right, but always time to do it over...?
I bought a steam cleaner and various degreasers and hope to start the task of cleaning years of leaking off the underbelly of the beast tomorrow. Then dye the oil and confirm where the leak(s) comes from.
The joys of Toronado ownership. Buggers. Better fire up the propane heater in the garage I guess. You have a engine hoist/lift & stand? Christmas sales are coming up.
It seems like there would be various ways things could be accomplished,
Once again, look at the photo I posted of the underside of a Toro. The transmission case overlaps at least 1/3 of the pan. You can't even access the pan bolts on the driver's side because of that. In any case, pan removal isn't the problem with the OP's car. The rubber seal on the bottom of the front cover was pushed out of place when the cover was reinstalled. The cover needs to come off and the seal replaced. Pan removal isn't needed to do that.
Joe, I found your original post on removing the front dowel to aid in installing the front seal without loosening the oil pan. Did you do this with the crank seal installed, or did you install that seal once the cover was in place and tightened down? It seems if the front seal was out, then you could use downward pressure to push the front cover into place and catch both dowel pins equally/evenly as you line up the attaching bolt holes on either side. Am I missing anything? For one, I'm not sure if the front seal can be installed easily without the cover being removed. Any last words are welcomed - I'm gearing up to do this job over the weekend, God willing and the creek don't rise.
Joe, I found your original post on removing the front dowel to aid in installing the front seal without loosening the oil pan. Did you do this with the crank seal installed, or did you install that seal once the cover was in place and tightened down? It seems if the front seal was out, then you could use downward pressure to push the front cover into place and catch both dowel pins equally/evenly as you line up the attaching bolt holes on either side. Am I missing anything? For one, I'm not sure if the front seal can be installed easily without the cover being removed. Any last words are welcomed - I'm gearing up to do this job over the weekend, God willing and the creek don't rise.
Good luck with this job! I'm very interested in how you make out so be sure to take lots of pictures and post em on here! If you don't mind, that is
Joe, I found your original post on removing the front dowel to aid in installing the front seal without loosening the oil pan. Did you do this with the crank seal installed, or did you install that seal once the cover was in place and tightened down? It seems if the front seal was out, then you could use downward pressure to push the front cover into place and catch both dowel pins equally/evenly as you line up the attaching bolt holes on either side. Am I missing anything? For one, I'm not sure if the front seal can be installed easily without the cover being removed. Any last words are welcomed - I'm gearing up to do this job over the weekend, God willing and the creek don't rise.
With the balancer off, there's plenty of clearance between the crank seal and the snout. Once I pulled the dowel pins, I made two eccentric bolts that fit into the two lower 3/8" bolt holes in the block. These allowed me to align the front cover seal over the oil pan flange then turn those eccentric bolts to compress the seal against the oil pan. Insert the two upper 3/8" bolts to hold the pan in place and drive the dowel pins back into position. Snub up a couple of the 5/16" bolts to hold the cover in place and you can remove the 3/8" bolts and reinstall the front mount. Done.
I made the eccentric bolts by cutting the heads off of a couple of 3/8-16 bolts and using a bench grinder to create the eccentric part. I then slotted the end to allow me to turn them once in place. Thread into the block with the eccentric up, put the front cover into place, and turn the eccentric bolts 180 deg to force the seal against the oil pan. Be sure to hold the cover in place, as it will want to squirt out. I did one side at a time and immediately threaded the upper 3/8" bolt into place to hold it, then did the other side.
I finally got back around to this project yesterday. Carb off, intake off, heads off. The PO had really done a number with this one. How about a turkey tray with no sealant around the coolant areas? And the previously mentioned lower timing cover gasket had to be the original piece with loads of gray sealant squirted everywhere. I�ll spend a few hours cleaning that off of a dozen surfaces. And the timing chain had been replaced with one so loose that I think I would have rather seen the nylon teeth when the cover came off.
I used a carefully cut wood block to raise the block assembly slightly after loosening the front engine mount nuts from underneath, then moved to the front 4 mount bolts and removed them. At that point the engine mount fell forward and could be removed. I used two pieces of 2x4 10-1/2� long wedged under the corners of the block to steady everything. This was my main concern besides the timing cover gasket - holding the block in place. The timing cover itself came off easily and following Joe�s instructions on replacement will be no problem. I�m still a ways off on completing this. I found a rough spot in one cam lobe and a matching cupped lifter base. The heads are also off to be redone as one cylinder with low measured compression matched up to two valves that no longer seated completely. And I have at least two days� worth of scraping gunk and degreasing everything to start. But it�s started�
Not a lot to share, but waiting for parts and services has delayed everything. I’ve focused on cleaning and restoring the parts I have removed for now. Still arriving this week: new timing set, cam, resurfaced lifters, oil pump driveshaft, AC condenser and compressor, and various small parts. Looks like I may need to replace the drive axles, but that’s not too much. Brakes will follow the reassembly. The low compression measurements turned out to be a cracked head, so that is replaced and the pair is sitting with new valves and springs, ready to install. The lower timing gear took over an hour to remove, as it had been carefully hammered into place by Grog the Destroyer of Things. The timing chain on now is just a test fit piece, and a new adjustable one is on the way.
For now, I’m here:
Last edited by BSiegPaint; February 21st, 2024 at 04:48 AM.
don't forget to remove that rag out of the oil pan before putting the cover back on.as joe mentioned there is plenty of room with the seal in place but be careful you don't catch it on the crank key,
don't forget to remove that rag out of the oil pan before putting the cover back on.as joe mentioned there is plenty of room with the seal in place but be careful you don't catch it on the crank key,
Ohhh yes - and no worries with the rag. It's just in place to keep out all the crap I've been scraping off the rest of the motor. Camshaft arrived yesterday and it was a POS. I bought from Mondello through eBay, thinking surely they would at least sell me decent goods... I was wrong. I just hope I get my refund before they go out of business. Horrible.
After 3 more weeks, I was able to get a Melling 25211 cam delivered, and great friend Rob Del Vecchio came over to install and degree it. We installed it straight up, as this is a cruiser, and the cam is pretty close to a stock replacement. Cam in, and heads on - but checking the lifter preload showed us pretty quickly that the shop had done the valves wrong. So back they go to the shop this morning, but I wanted to post up some “getting closer” pics.
New timing chain
Front cover installed - even with Joe’s instructions, still kind of a b*tch with the oil pan in place.
It was just after putting the front cover in place that we again jacked up the engine about 2" and installed the front motor mount. Wasn't too difficult, even with a slight shove needed to one side to drop the mount studs in place. Tightened up the nuts on the cross member and the motor is back as it should be, answering my first question that yes, the front mount has to be removed for front engine service like the front seal, but that there are ways to support the block without pulling the motor out if you don't want to.
Water pump and balancer on
There really is room to sit inside the engine compartment and wrench - sometimes it’s necessary.
For a while we were thinking everything was awesome - but another short delay won’t kill me. Get the valve stem height set correctly and the top end will go on quickly.
Last edited by BSiegPaint; March 18th, 2024 at 07:51 AM.
Best shot of the day - here is the front of the oil pan behind the motor mount. Compare to the shot in post #7. This has been a leak for a long, long time. Hopefully we have this buttoned up and leak-free from this point forward.
Best shot of the day - here is the front of the oil pan behind the motor mount. Compare to the shot in post #7. This has been a leak for a long, long time. Hopefully we have this buttoned up and leak-free from this point forward.
After finding the valve job was done incorrectly, I pulled the heads and sent them back. Today I reinstalled them and broke out the new rockers and mounts - only to find out the pushrods seem far too short. Still, while everything was installed, I figured I would bump the starter over a few times to check compression, and then prime the engine with oil using the oil pump drive. What I found was that even with 50 psi pressure from the speed of the electric drill I was using, I could not get oil up through the pushrods. I tried a number of different positions with a number of different cylinders, but all I could get was a weeping oil amount around the lifters - but nothing up the pushrod to the rocker. If was around this time we noticed there was no oil on the oil pump drive shaft we were using to prime the motor. Something is definitely wrong, and as much as I didn't want to, I have to pull this thing out. The oil pan needs to come off and we need to determine what's happening with the oil circulation. SO - first thing, get new pushrods. I've seen 9.574" and 9.622" as proper measurements - if anyone knows for sure, I'm all ears. Then I'll see if I can find a TH425 gasket/filter kit since now is a good time to mess with the seals and other trans things. I really hoped I was on the downhill slope with this, but it seems like I hit a plateau on the way up. Time to get the hood off and get down to it... Oh, and by the way, the compression is a solid 185-190 on all cylinders, so that is good news.
After finding the valve job was done incorrectly, I pulled the heads and sent them back. Today I reinstalled them and broke out the new rockers and mounts - only to find out the pushrods seem far too short. Still, while everything was installed, I figured I would bump the starter over a few times to check compression, and then prime the engine with oil using the oil pump drive. What I found was that even with 50 psi pressure from the speed of the electric drill I was using, I could not get oil up through the pushrods. I tried a number of different positions with a number of different cylinders, but all I could get was a weeping oil amount around the lifters - but nothing up the pushrod to the rocker. If was around this time we noticed there was no oil on the oil pump drive shaft we were using to prime the motor. Something is definitely wrong, and as much as I didn't want to, I have to pull this thing out. The oil pan needs to come off and we need to determine what's happening with the oil circulation. SO - first thing, get new pushrods. I've seen 9.574" and 9.622" as proper measurements - if anyone knows for sure, I'm all ears. Then I'll see if I can find a TH425 gasket/filter kit since now is a good time to mess with the seals and other trans things. I really hoped I was on the downhill slope with this, but it seems like I hit a plateau on the way up. Time to get the hood off and get down to it... Oh, and by the way, the compression is a solid 185-190 on all cylinders, so that is good news.
If you are getting 50 PSI at the front of the engine, you are pumping something. My thoughts would be to have you prime the oil using the drill and remove one valve lifter at a time to see if oil is pumping from one lifter to the next. Start at the rear and move forward. You can also try a stock lifter to see if the oil comes to where the Push rod would be.
If the stock lifter flows oil in every position, it might be time to examine your new lifters for a problem. What brand valve lifters are you using ?
You will need an adjustable push rod to measure for the new push rod length. .
I don't think your going to see much oil at the top end till the engine is started and the lifters pump up. Re ground cam will affect pushrod length you need as well as the valve job. Should be checked with lifters dry. Adjustable pushrod is best but at min verify lifters not bottomed when rockers drawn down and no gap at stem
If you are getting 50 PSI at the front of the engine, you are pumping something. My thoughts would be to have you prime the oil using the drill and remove one valve lifter at a time to see if oil is pumping from one lifter to the next. Start at the rear and move forward. You can also try a stock lifter to see if the oil comes to where the Push rod would be.
If the stock lifter flows oil in every position, it might be time to examine your new lifters for a problem. What brand valve lifters are you using ?
You will need an adjustable push rod to measure for the new push rod length. .
I had the original lifters rebuilt by Egge in California, and I have one brand new Sealed Power lifter that was swapped in for a random lifter to see if there was any change, and there was not. Each lifter was pulled, and you can get a shot of oil out of each high enough to hit the hood insulation. So we have pressure. We installed all of the rockers and lifters (brand new Melling brand) and they are at zero lash. We rotated the engine a number of times - bump by bump to set each pair of lifters in the positions where oil should travel through them and up the pushrods, but even with extended periods of running the oil pump, nothing even came to the rocker arms. We also noted that there was never any oil splash on the oil pump tool we used to spin the oil pump. The most oil we saw was a seepage up and around the lifters into the valley.
Every other time I've rebuilt a motor the oil has pumped up within 10-15 seconds of spinning the oil pump. This time we are talking about minutes of pumping at various positions. The lifters are pumped up enough that they cannot be compressed by hand. Pushrods are definitely a suspect here, as they are too short. BUT they are all straight and clean in the center. I'm not using a reground cam. Valves are all refitted/remeasured and springs are shimmed to the proper height.
As I talked it over with my engine guy, we are assuming the oil pump screen could be clogged, and while we are getting pressure, we are not getting volume. I tried to get away with not pulling the engine and leaving the pan in place, but maybe that wasn't the best idea.
Last edited by BSiegPaint; April 23rd, 2024 at 03:55 AM.
 November 1st, 2023, 05:05 PM


")